If you think developing a game is hard, try doing it with someone you don’t know located on the other side of the world. In this tutorial, I’ll share the fundamentals of developing a pipeline and improving your team’s workflow in those cases where each member of the team is in another timezone. Let’s get started!
Step 1: Planning

No matter how simple your game idea is, you need a Game Design Document, or GDD.
The GDD is the backbone of the project and is particularly important when making international collaborations because you must have every member of the team aiming for the same goal from the very beginning of the project – otherwise, the team is likely to bump into unexpected obstacles later on.
There are different ways to lay out a GDD, but you definitely want it to include the following elements:
- Name of the Game: This should also include other possible names taken into consideration during the brainstorm session
- Game Overview: Think of this as the pitch; it includes the game genre, features and target audience.
- Gameplay: This includes primary and secondary player objectives.
- Game Mechanics: In here you set the rules of the game and also the way the game is played (keyboard, mouse, touch based).
- Scoring: In here, you define the win and lose conditions.
- Other Aspects: This is where you describe the characters, levels, and graphical style.
- Additional Details: In here, you should specify the dimensions of the game, the expected file size of the game and any other details that you think will be useful for your team mates
Once you’ve started developing the game, the team might have additional ideas that they would like to implement. Be careful: this can make the team wander! Just write them down and have them in mind for a possible sequel.
Step 2: Project and Time Management
Now that the project has been defined, it’s time to let the team members know what they need to do, and when they need to do it.
Tip: It really doesn’t matter what type of software you will be using, be it online, offline, paid or free. The most important thing is that you and your team feel comfortable with it and that you understand the principles and best practices behind every step.
The best way to manage a project is using a project management tool. Believe me, I’ve tried almost all of them, from Basecamp to Zoho. My personal favorite is Trello because it’s simple, straightforward and optimal for small teams.
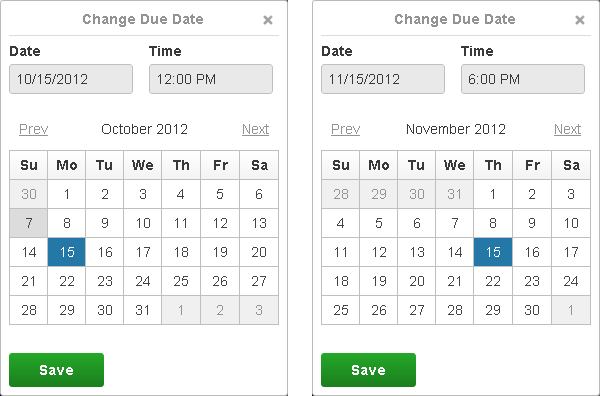
The features of almost all project management software are very similar. In the case of Trello you can manage several projects known as “Boards”. Boards are made up of multiple lists of “cards” – the basic units of the board – which can contain comments, checklists, attachments and due dates. Cards can be dragged from list to list, which gives a lot of flexibility during the production phase.
Your project management software should allow the team to have an entire overview of the project at any time – that way each person can see what they have to do, and what others are doing. (I’ll explain the reason for this in Step 4.)
Workflow
The bigger the project, the more tasks need doing. To keep things organized, I suggest color coding every task and sorting them vertically in descending order of priority.
I color code tasks based on the team member assigned to work on them, but you might want to color code tasks in terms of planned or implemented tasks; if the programmers have their own board, they might color code bugs and features in a way they understand.
The most important thing is to make sure that all the people involved in the project know what the colors mean. You can describe this in the GDD.
Tip: Having a web-based project management tool has a lot of benefits when working with people in other timezones: they can work anywhere, there’s no need to install software, most of the tools have integrated mobile functions, and all changes are propagated instantly.

Due Dates
Due dates are definitely the most underused feature by game development teams that are just starting.
There’s a big difference between having a to-do list and having a schedule, and you need to realize that it’s vital that you set dates for everyone in the team. This way, everyone knows when to expect things, and everyone will be looking forward to the next milestone.
Tip: Having good scheduling practices can save a lot of time and money, especially when outsourcing work. Most freelancers charge daily or hourly and if you welcome them with a tidy schedule they will appreciate it – as will your wallet!
Step 3: File Management

Another aspect of development that you must cover before starting is the structure and location of the files that will compose the game.
Keep in mind that while you’re sleeping half of your team will be working on new assets. They must know where to place them without having to ask you, and they must know where to find the assets they’re looking for.
There are many different tools that synchronize files; personally I use Dropbox. It’s intuitive, it’s easy to use, it lets everyone on my team access the files via the web and lets me restore files if someone accidentally deletes them.
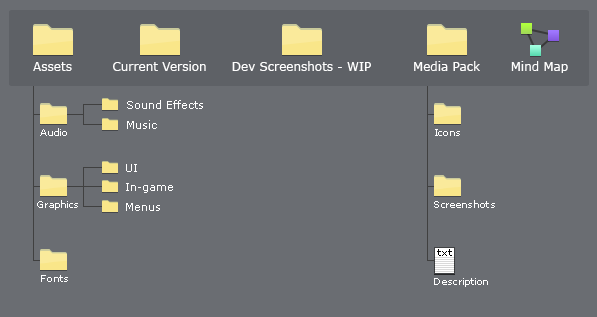
When creating the project folder that will be shared with all members of the team you want to pick something that can be easily understood. Of course, there are different ways to do this according to your needs and the needs of the team, but I recommend something along these lines:

- Assets: This folder contains all the sounds, images and fonts the game will use. Multiple subfolders must be created to specify the category of each file; you should be as specific as possible.
- Current Version: This folder contains a playable version of the game (or at least a playable component – a basic character jumping or the game’s main menu).
- Dev Screenshots – WIP: Inside this folder, the graphical artists can publish “work in progress” screenshots and mock-ups. The programmers can also take screenshots of the game in different stages of development. (This folder will be very valuable when making a post mortem.)
- Media Pack: The media pack contains every asset that will be used towards representing and advertising the game, including game icons, preview icons, banners and feature screenshots. I also like to include a text document with the information most frequently asked when submitting a game to a distribution service or web page, such as game description, features, instructions and tags.
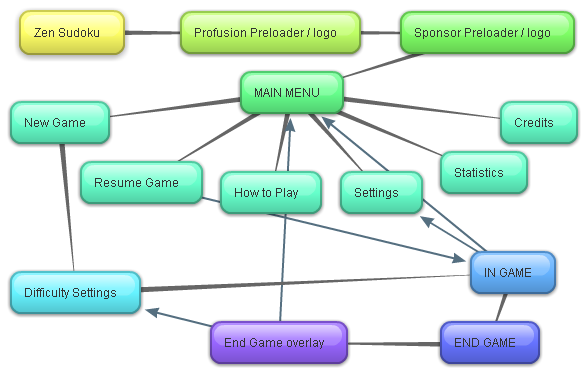
- Mind Map: This is something I personally like to include in the root folder for the project, and it’s a mind map (more like a navigational map) for the different screens that the player will go through when playing the game.

Mind map for one of my games, showing the connections between screens and how the player can navigate through them
Step 4: Keeping Morale High
When you’re working in a physical location with others, you can talk with them at all times and see they’re focused working. But the only feedback that you’re getting when working with an international team is through each person’s output. This is why many international efforts in game development are unsuccessful.
Tip: It’s critical that you keep communicating with your teammates on a daily basis to maintain the team attitude and drive towards reaching the goal.
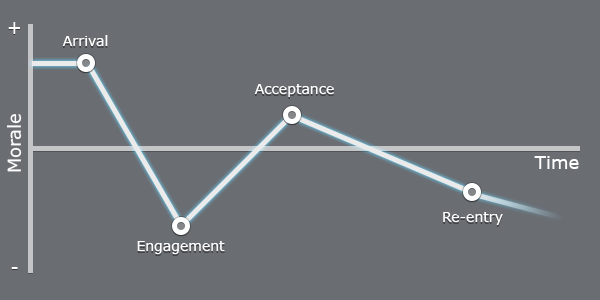
I’ve made successful and unsuccessful projects in the past, and one of the most important things that I’ve learned is that no matter how much your team loves making games, their morale will have its ups and downs. In the following image I will explain some of the stages that a team goes through.

This is a morale curve: it represents emotional cycles people go through. Gamedev teams go through similar transitions.
- Arrival Stage: Also called the Honeymoon stage. Everyone is excited and the team’s morale is high.
- Engagement Stage: This is where team members are fully committed. Problems arise as well as frustration. I’ve noticed that correct planning gives great momentum to go through this stage easier.
- Acceptance Stage: The team realizes the efforts they’ve made and performance grows. This is a great moment to get things done.
- Re-entry Stage: In this stage the team will look for a completed project; if there is none and you’re behind schedule, it’s likely that someone will leave.
Some Tips to Maintain Morale
- Pick certain hours to talk to your teammates about the progress of the game.
- Take a glimpse of completed tasks in the project management tool.
- Browse the project folder and compare older Dev Screenshots to new ones.
- Ask the programmer to compile a small, playable version of a level or a feature for everyone to play.
- Play the game! Even in alpha, playing the game will make you look forward to seeing it finished.
Final Thoughts
Hopefully this tutorial has given you a good understanding of the different phases of international collaborations and its advantages as well as pitfalls. Of course, the best way to keep learning is by making those collaborations. I encourage you to assemble an online team and develop a simple game following this tutorial.
I would like to thank my game development partner, Matt Pope, for helping me improve my game development techniques over this last couple of years.
Thanks for reading!
