You have finally finished making a truly unique and amazing game—congratulations! Now comes the hard part: getting people to play it.
If you are anything like me, then you have likely spent all of your time and energy (and money) on actually creating your project, and don't have a lot of patience or funds left over for the most important part of the game development journey: marketing. Luckily for you, you likely already have everything you need to create a professional looking gameplay trailer for your game. In just a couple of hours, you could be well on your way to YouTube glory!
Why Does Your Game Need a Trailer?
Looking at the App Store, Google Play store, and Steam lately, it's easy to see that the marketplace is getting crowded. The number one challenge faced by every indie game developer is getting their product noticed. You need to come out of the gate in the initial weeks and months of launch with all barrels of your promotional arsenal loaded and firing.
There is no better way to show people why your product is awesome than with a short, well put together trailer detailing why your game is special; and also telling people where they can get it!
What Do Your Need?
To make a simple (but awesome) gameplay trailer, you need the following:
- A computer (hopefully you have one of these already)
- Video editing software (I use iMovie, which comes free with OS X)
- Video screen-captures of your game
- Background music
- A decent font to use for your text
- Still screenshots (optional)
Always check the licensing of all assets that you use. Ensure that you have the rights to distribute it in video form, as well as within your game.
Choosing Software
There are a ton of options available for free (or nearly free) video editing software available. The screenshots that follow will be of my software of choice, but of course you are not restricted to using just one option.
Several great free options are:
- iMovie 10 (Mac, free with OS 10.9)
- Windows Movie Maker (Windows, free)
- Open BroadCaster Software (Windows, https://obsproject.com/)
When choosing software, the most important aspect is to choose a product that you find easy for you to use, and that is readily accessible. Here are two great examples. I use a visual-based software, iMovie, available for Mac:
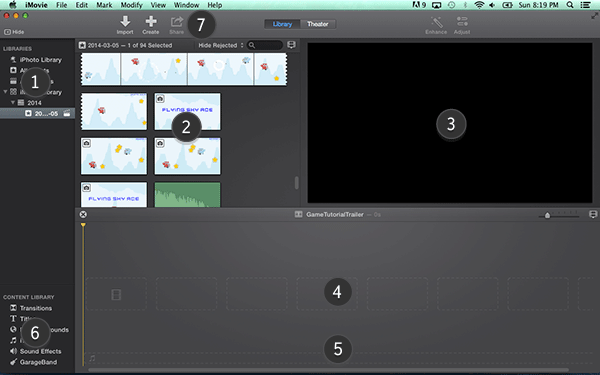
- Sidebar Asset Library (where your video, sound, and image files will show up)
- Clip Browser
- Project Preview Pane
- Video Timeline
- Audio Timeline
- Sidebar Content Library
- Menu Bar
Another popular choice for video editing is Adobe Photoshop. As of version CS6, a powerful video editor has been incorporated into the program.
Here is the standard interface for video in Photoshop:
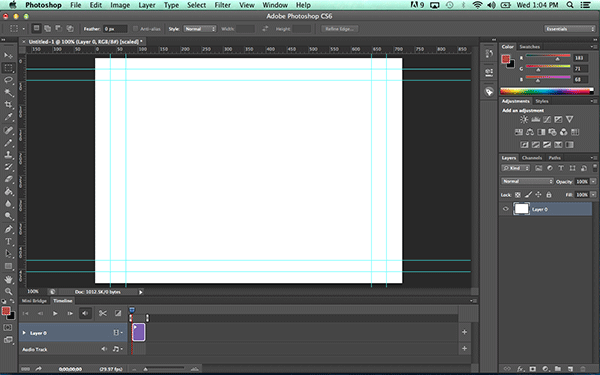
Photoshop grants access to all the editing tools available for standard still images for use with video files, but with all that power can come a slightly larger barrier to entry.
Plenty of tutorials exist online for using various programs; what I will say is, you should find one that works well for you, without putting up too many walls. The point is to be able to build a trailer without taking you away from working on your game.
Gameplay Video
We can't talk about making a trailer without having a game to make a trailer about! So here, take a gander at the amazing new game: Flying Sky Ace, exclusive to this tutorial:
This is the sample video file that we will be using over the course of this discussion to create our trailer from. I use a product called Reflector (which has a free version) to capture screenshots and video live from my devices to make trailers and sneak peeks from. If you're on Windows, you could use FRAPS instead.
This is very important to note: I never use emulators when taking video that I intend to use for production or marketing purposes. The simple reason for this is that I always want my trailers and promotional material to be reflective of the actual experience. Emulators can be buggy and jarring, and you want the best possible version of your project showing through these videos.
To make your video editing as simple as possible, remove all background music from the game before taking the video capture. Leave the sound effects, though!
Later we will add a background music track to the entire video, and by removing the music from the gameplay video capture, our process just got a ton easier. Leaving in the sound effects will help to grab the audiences attention during the trailer, and help to keep the action during the video grounded.
Audio Assets
Aside from the gameplay video, you will need to choose the background music for your trailer. Fortunately, you likely already have a pool of audio resources to choose from from your game. To make things simple, choose a single background music loop that is at least as long as your trailer will be.
By avoiding cutting different audio tracks, we will greatly simplify our editing process, and avoid creating jarring thematic changes over the course of our trailer. We don't need any additional sound effects or voice overs, because we left the effects in from our video captures! That should again make things much easier down the line.
I've chosen to use the track Rainbow for this trailer. Make sure that the audio track you choose follows the theme of your game, but try to keep things up-tempo; the function of a trailer is to generate excitement for your game, after all.
Still Shots

I have included still shots as an optional component to your trailer. They can be effectively used as background elements in a pinch, but I would caution against using them too much. A trailer is most effective when it is visually interesting, and a still image is inherently boring.
If you are looking to convey a textual message to your audience, try to keep the action flowing in the background at the same time. We will look at some ways to accomplish this later on.
One great use for a still image for your game trailer is as a final splash screen. You can have your trailer end with this image for a few seconds, and convey important information such as social network links, the game's website, and the release window.
Jump into your favourite image editing software, and either create it on a black background, or modify one of your existing still images. You'll end up with something like this:

Importing Assets
Let's look at importing your assets into our video editing program. I'll run through the process with iMovie 10, but the basic process should be similar for whatever software you're using.
Create a new project, and import your video, audio and image assets. In iMovie, this is done by clicking the Import icon in the Menu Bar to bring up a file navigator.
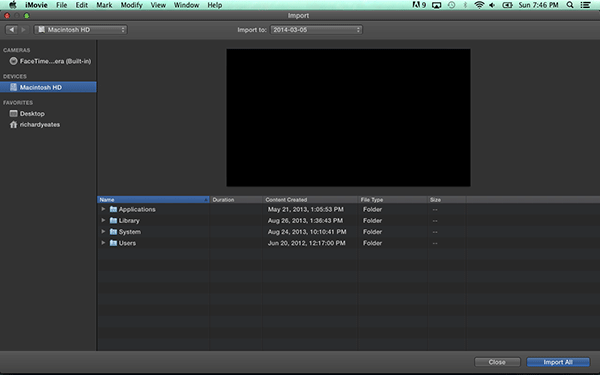
Locate the folder containing your video, music and image files and click Import All to bring the assets into your workflow.
After importing your asset files, the Clip Browser will now be populated with media. Audio files will show up as green timeline artifacts, video files as timeline clips, and images as single frames with a camera icon on them.
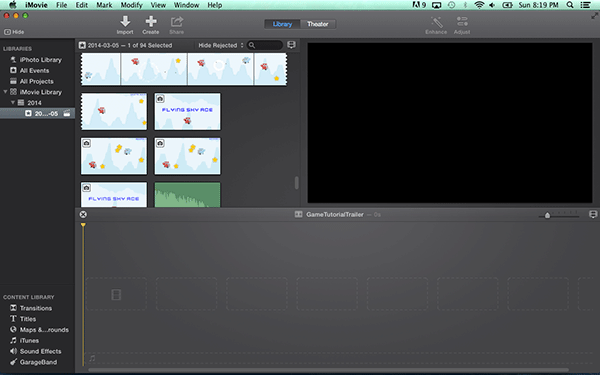
Select audio or video frame sequences by clicking-and-draging over desired sections, resulting in a yellow-framed bounding box. To select an image, simply click on it. When you have made a selection, drag it down into the timeline to populate it in your desired order. You can always move sections around later, so don't get too bogged down early on by trying to make this look perfect.
Lights! Camera!
Okay, now let's begin to build something resembling a game trailer. Select some sections of clips and drag them into your timeline. Next, click on each in the timeline and detach the audio from the video (Modify > Detach Audio). Also, drag in your background music to the audio timeline.
You should be left with something like this:
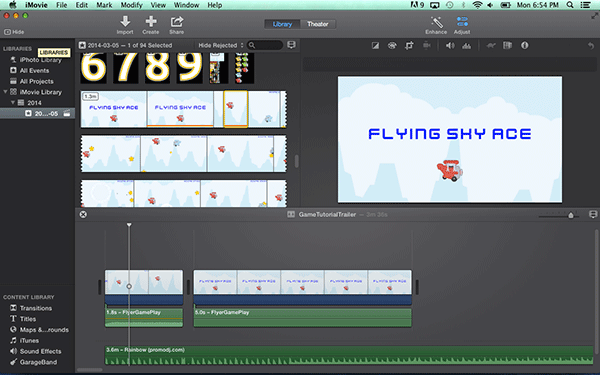
Why did we bother with detaching the video audio? To be honest, you might not need to, but I find it a useful step. Detaching the audio gives you control over its tempo, its fading, and most importantly its volume. You may find the sound effects from the game drown out the background music or voice over if you happen to include it, and this gives you a level of control you wouldn't otherwise have.
If you want to have a look at how the trailer builds out right now, press the Space bar to begin a playback in the preview panel. Press Space again to pause the playback, and use the mouse or the \ key to move the playback cursor back to the start of the timeline. These commands are common to most video editing software, but may differ slightly depending on your program of choice.
Move clips around until you find a pattern that you like. Keep in mind that video editing is very fluid, and you will be changing everything a lot while you flesh out this trailer. The key is to just keep working and don't get too bogged down by any one step.
Speaking of fleshing out this trailer, we could sure use a way to communicate some information to our audience...
Building a Better Trailer
Textual information is presented in the form of titles. In Photoshop, you can use the built-in textual editor to overlay titles onto your video. Place titles in keyframes throughout the timeline, and then perform transitions and fades on that text object in the layer tree to give it the appearance of motion and fluidity within your movie.
In dedicated video editing software, it is often much easier than this to add titles to our movie. If you are using iMovie, look at the Sidebar Content Library in the lower left corner of our interface and you will see a widget just for these. Click it to populate the Clip Browser with all sorts of goodies. If you hover your mouse over any one of them, it will allow you to see a preview of what it would look like in your project.
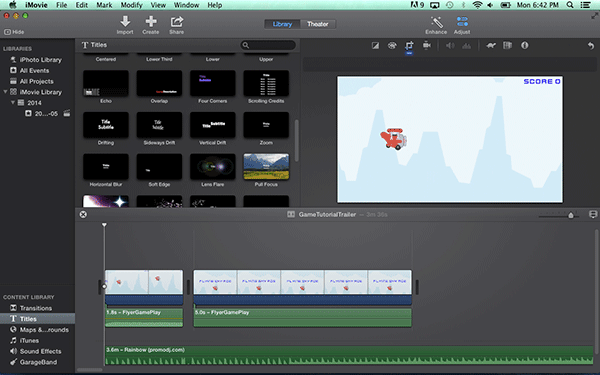
Titles are used in two ways, as an overlay element to your clip and as their own "clip" segment. Play with all of the options available to you and decide what titles best suit your game and trailer. Video editing is very much an art form, so telling you what to use would be a disservice. Just work within your theme and you will be fine.
Here's what I did to Flying Sky Ace:
At the end of the video, notice how it has a nice fade to black? That is the first example of some finishing touches that we are about to add to our trailer. The rest of the video seems choppy in comparison, and that's because we haven't added any transition effects between our clips yet.
Finishing Touches
A transition creates a visual cue tying two scenes together. If you have ever watched the Star Wars films—particularly the prequels—you have seen them used to almost embarrassing effect. We will now look at using a few transitions to help smooth out our trailer, without going overboard.
As it stands, your timeline should look something like this:

A transition element is visually indicated on the timeline in iMovie by the grey box with two arrows. Other programs will represent them in a similar manner.
As a rule, I always use a transition between two clips in my trailers. Having a cut between two clips without any form of fade or dissolve will seem jarring to your audience, as you likely experienced in the last video. In iMovie, the transitions menu is available in the content library. In other programs, they are similarly accessible. Experiment by dragging in various transitions and playing with the timing and variety available to you within your program of choice.
Again, there is no right or wrong. As a general rule, I like to stick to one or two types of transitions and one or two forms of titles within my trailers. I find that by staying consistent, my videos seem more cohesive. Play with it and find what works best for you. Here is what I ended up with:
Your final timeline will look something like this:

For a final finishing touch, I added a fade-out to the background sound file. In iMovie, this is accomplished by clicking and dragging on the volume at the very end of the timeline representation for the audio file.
With the trailer made and published to the web, there is only one more facet of the process to consider...
Selling Your Game
As indie game developers, we typically have to wear a lot of different hats. Depending on your setup and team, you could be a programmer, artist, audio-tech, musician, director, producer, and finally salesman. I have two rules about marketing:
- Never ask anyone to play your game; instead, focus on telling them why they should.
- It doesn't matter how awesome my game is if no-one knows about it.
Marketing begins long before you release your game. Your trailer needs to be both the introduction to your game, and also the final push in guiding people to the decision that they simply must give it a whirl.
Focus on the gameplay, atmosphere, mechanics and features that your game provides. Leave an impression. Post links to your trailer on websites, Facebook, Twitter, and so on. Your advertising campaign will end the moment you let it. Good luck!
Conclusion
I hope that this tutorial has helped you on your path to making a sweet trailer for your game. What's more, I hope that you've realized that you can do it for little to no money, and with a time commitment of about an evening.
You already have everything you need. Your game works, so take some video of it (free). You have a computer, so grab some free editing software (iMovie, Windows Movie Maker) or if you have Photoshop CS6, you already have everything you need. If you have music for your game—and you should—use it in your promotional tools too! (Just make sure to check those licenses.)
Thanks for reading! I'd love to see the trailers you make for your own games—drop a comment below or send me a message!
References
- Rainbow: Gichco; CC0 Public Domain
- Gun Effect: www.rustltd.com; CC0 Public Domain
- Engine Noise: engine_takeoff.wav; dklon; CC-BY 3.0
- Explosion : artisticdude; CC0 Public Domain
- Shimmer: The Berklee College of Music, qubodup; CC-BY 3.0
- Tappy Plane Graphics/Font Package: “www.kenney.nl” C/O opengameart.com; CCO Public Domain
- Clapperboard by sortagreat icons from the Noun Project
