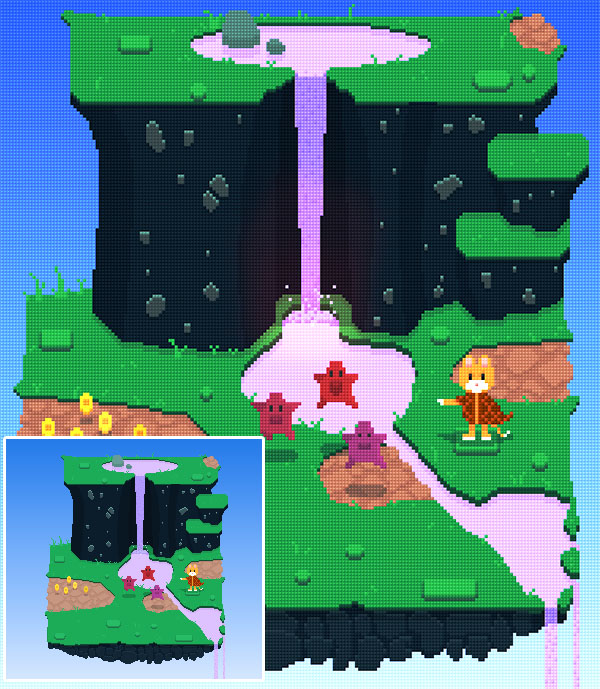
Many game developers are programmers first and artists second. Whether you’re using pixel art because you prefer the "retro" look, or you just don’t have the time or experience to take your art to the next level, this simple effect can greatly increase the visual appeal of your game.
This beveled pixel style is accomplished by first enlarging your 1:1 pixel art while maintaining the original aspect ratio. Then, through a very simple process that can be applied during asset creation or at runtime, you can turn your standard pixel art into something that looks great even at HD resolutions. The effect is so simple that it can be applied in nearly any programming language, development environment, and engine. In this tutorial, I will introduce you to beveled pixels in such a way that you will confidently be able to implement this effect in your own game project.
The Basics
So what exactly is a beveled pixel? A single pixel is the smallest graphical element that is used to represent art in digital form—so, in a way, you can think of pixels as 2D building blocks. A beveled pixel merely expands on that building block concept by introducing artificial depth.
Things become a bit confusing when you realize that beveled pixels are composed of multiple ‘regular’ pixels, but it’s actually no where near as complicated as it seems. To fully understand the process, we'll start from the beginning with a basic understanding of pixels.

First, let's talk about pixel sizes and ratios. The above image shows the same sprite at its original size, and then enlarged all the way up to five times that size. For each enlargement, the original pixel 'building block' also increases in size. When a standard pixel is enlarged five times (500%), it becomes a 5x5 block of pixels. Now you're left with a sprite that has a 1:5 pixel ratio. This number simply means that every 1x1 pixel in the original sprite is now represented by a 5x5 block of pixels. The entire sprite, originally measuring 14x15 pixels, is now 70x75 pixels in size.
Now that our sprite is composed of much larger pixel "blocks", we can see how beveled pixels work.

The above image shows the same sprite using standard pixels on the left and beveled pixels on the right. With standard pixels, each 5x5 block is composed of the same color. In the beveled pixel example, we can see that the 5x5 block now consists of several different shades of the same color.
The first square in each version is the 5x5 pixel block that represents the standard 1x1 pixel in the original image. The second set of squares is a magnified version of this 5x5 block to show the composition of the beveled pixel block. These pixels are arranged in such a way that they give the illusion of depth, with highlights on the top-right corner of the 5x5 block and shadows on the bottom-left corner. When combined to create the final image, this results in a sprite that appears to be made up of tiny, beveled blocks, instead of flat, 2D pixels.
How the Effect is Created
Now that you understand the basics of beveled pixels, let's briefly summarize how this effect is achieved.
First, you have to determine whether you're going to implement this effect at runtime in your actual game, or generate your art assets with beveled pixels "baked in". In either case, the beveled pixel effect is achieved in roughly the same manner.
You start by creating a bevel sprite that's the same dimension as your final enlarged 'sprite block' size. For instance, if your final artwork is going to be 1:4 (enlarged four times), then you will create a 4x4 bevel block. This bevel is then applied on top of the enlarged sprite or game window, and repeated to fill the entire screen. By playing around with blend modes and opacity, you can achieve different results.
I will cover both methods in greater detail later on, but for now we should pay attention to a few critical rules and guidelines.
Important Guidelines to Remember
While this effect is easily achieved by applying a simple overlay, there are several major things that can prevent the beveled pixels from lining up properly.
The most obvious issue is sprite size versus your bevel overlay size. All of your assets have to follow the enlargement ratio dictated by the size of your bevel block, or the bevel lines will not be consistent.
It's also important to decide your game window size before enlarging any of your assets. If your game window size is 640x480px, and you want to use a 4x4 bevel (1:4 ratio), then your original assets should be designed at 160x120px. When enlarging art assets, remember that everything needs to be 'X' times larger than the original size, where 'X' is a whole number.
Any change in the game view or individual sprite positioning must also be carefully considered when attempting to draw the bevel overlay. This brings us to the most important rule to follow:

Grid-based movement is mandatory! In the above image, we have a correct example of grid-based movement on the left and an incorrect example on the right. Because the original assets have been enlarged four times, all vertical and horizontal movement should snap to a 4x4 grid. The cat sprite, on the right, has moved one pixel to the right and one pixel down, resulting in the sprite breaking the flow of even bevel blocks.
That was an example of a beveled pixel effect that was "baked in" to the assets. The following example shows what happens when you don't follow grid-based movement while implementing the effect at runtime:

Notice how the bevel pixel overlay is slightly misaligned across the entire image. This is because the bevel overlay covers the entire game window and does not move, while the sprites underneath are moving but not snapping to the 4x4 grid. Remember that all in-game movement has to conform to the grid dictated by the size of your bevel block, which is determined by your asset enlargement ratio.
Implementing the Beveled Pixel Effect During Asset Creation
Yes, it makes more logical sense to implement this effect within your game code rather than during asset creation. Applying this affect during asset creation, however, allows you more freedom to experiment quickly and find the perfect style that fits your project. You can apply various overlays using different blending styles, adjust the saturation and contrast of your underlying art, and replace colors to find just the right balance before deciding on your final look.
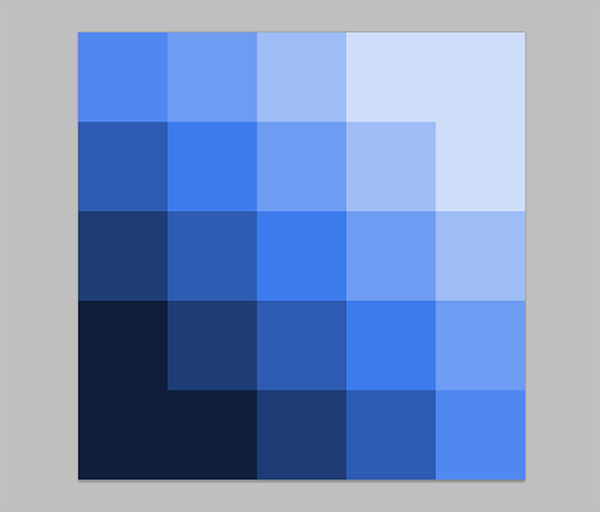
This is an enlarged example of a 6x6 bevel block. You will want to keep your bevel blocks on a transparent background, but I used blue here so you can see the difference in opacity.
To create this bevel block, I started with a canvas that fit my intended final art size. In this particular example, I created a 6x6 image intended for 1:6 pixel art (600% enlargement). Then, with a one-pixel brush, I started in the lower-left corner and applied three pixels of black at 75% opacity. As I moved away from the corner, I reduced the opacity of my brush to 50% and finally to 25%. I then mirrored that same technique, but with white, starting in the upper-left corner.
Many common tools, such as Photoshop and GIMP, allow you to create and define custom patterns. This is the quickest and easiest way to fill the entire canvas with a beveled pixel overlay. For the example above, I removed the blue background and saved the bevel block as a pattern. Now whenever I want to apply this overlay to my art, all I have to do is use the paint bucket tool to drop the pattern on the top-most layer.
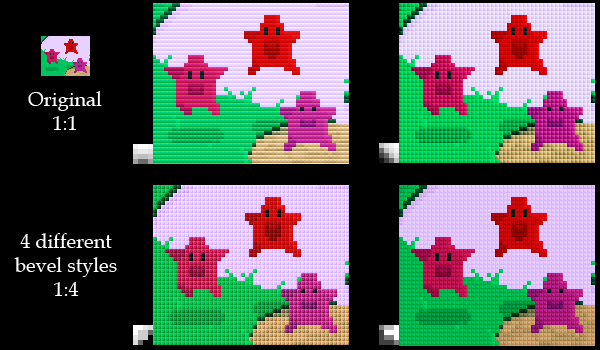
After you define a few custom bevel block patterns, you can begin experimenting with different styles. Above, we have four different bevel styles applied to the same image. Notice how subtle changes in the construction and opacity of the various bevel blocks can greatly alter the shape and vibrance of the resulting sprites. Experiment with different sizes and styles to find the type of bevel that compliments your pixel art.
Blend Modes
The various blend modes offered by most drawing tools can also result in drastically different effects.
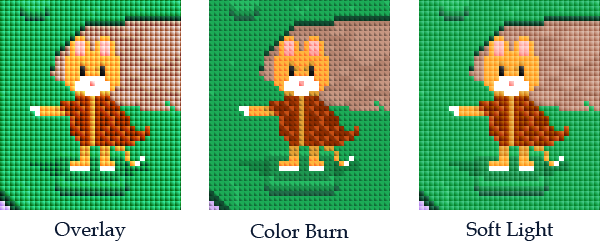
In the image above, the same bevel style is applied using three different blend modes. The standard Overlay mode creates a very striking and vibrant image, with an intense contrast between the light and dark areas of the bevel. The Color Burn mode completely mutes the light areas of the bevel, creating an almost triangular and disjointed bevel. The Soft Light mode is perfect for muted colors, creating a less pronounced beveled edge.
Implementing the Beveled Pixel Effect at Runtime
Rather than inserting assets into your game that have this effect baked in, you can instead generate the beveled pixel overlay at runtime. This will result in a game that's far more scalable and adaptable if you ever decide to change the assets, grid movement, or game window size later on.
While I can't tell you exactly how to implement this effect in your specific project, I can definitely point you in the right direction. Most game IDEs have the general functionality required for this effect, so you shouldn't have any issue integrating a beveled pixel overlay into your project. Flash and ActionScript users, for example, can use ColorMatrixFilter to apply blend modes to the bevel overlay, and Game Maker users can use the built-in foreground tools, or even create a dedicated bevel overlay object that rests on a specific layer above the art assets.
First, you need to decide how you're going to handle the initial asset enlargement. I recommend using 1:1 pixel art and scaling everything before drawing it to the screen, then applying the bevel overlay as a post-processing effect.
Second, you should think about creating a debug menu that will allow you to test various bevel sizes and blend modes. You never know how different colors and movements will react to certain bevel overlays, so play it safe and experiment with as many combinations as you can. You may find that it's necessary to change the opacity or blend mode during certain scenes of your game, so being able to test these out in real-time will definitely come in handy.
You should also plan for how you're going to handle the HUD or GUI for your game. Do you want these elements to sit above or below the beveled pixel overlay?
Tips and Tricks
- This effect is not a bandage for 'bad' pixel art. Yes, you can make your art more interesting with this stylized approach, but you still need some basic understanding of how to use color palettes properly. Working with 1:1 pixel art on a very small scale is a great way to learn how to be a better pixel artist, though, so use this effect as a learning tool and not a crutch.
- Certain bevel overlay styles won't be visible when placed over solid black or white sprites. You can use this to your advantage in a space shooter where a large portion of your screen real-estate is taken up by areas of solid black. This will make your stars, spaceships, and bullets stand out even more.
- This effect makes color gradients more readable and causes contrasting colors to stand out even more. This could be a benefit or detriment depending on the type of mood you want to convey.
- Don't have any art to try this effect on? Grab some old-school game screenshots and start experimenting!
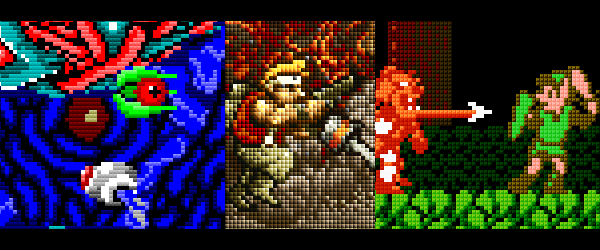
Conclusion
This effect is a wonderful way to spice up your game art without requiring any complex algorithms, shaders, or an insanely talented artist. Are you rushed for time in a game jam? This is a quick and easy way to add a little extra visual polish to your work.
The most valuable aspect of this effect, however, is that it encourages you to get your hands dirty and experiment, which will undoubtedly lead you to a series of other discoveries along the way.
