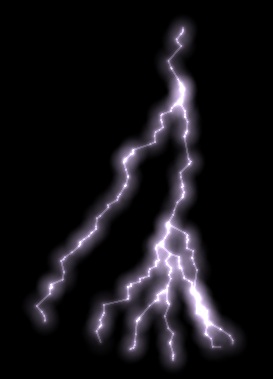
Lightning has plenty of uses in games, from background ambience during a storm to the devastating lightning attacks of a sorcerer. In this tutorial, I’ll explain how to programmatically generate awesome 2D lightning effects: bolts, branches, and even text.
Note: Although this tutorial is written using C# and XNA, you should be able to use the same techniques and concepts in almost any game development environment.
Final Video Preview
Step 1: Draw a Glowing Line
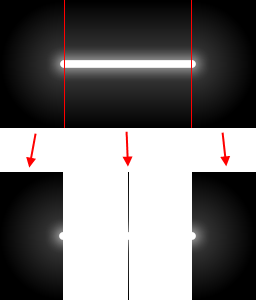
The basic building block we need to make lightning is a line segment. Start by opening up your favourite image editing software and drawing a straight line of lightning. Here’s what mine looks like:

We want to draw lines of different lengths, so we’re going to cut the line segment into three pieces as shown below. This will allow us to stretch the middle segment to any length we like. Since we are going to be stretching the middle segment, we can save it as only a single pixel thick. Also, as the left and right pieces are mirror images of each other, we only need to save one of them. We can flip it in the code.

Now, let’s declare a new class to handle drawing line segments:
public class Line
{
	public Vector2 A;
	public Vector2 B;
	public float Thickness;

	public Line() { }
	public Line(Vector2 a, Vector2 b, float thickness = 1)
	{
		A = a;
		B = b;
		Thickness = thickness;
	}
}
A and B are the line’s endpoints. By scaling and rotating the pieces of the line, we can draw a line of any thickness, length, and orientation. Add the following Draw() method to the Line class:
public void Draw(SpriteBatch spriteBatch, Color color)
{
	Vector2 tangent = B - A;
	float rotation = (float)Math.Atan2(tangent.Y, tangent.X);

	const float ImageThickness = 8;
	float thicknessScale = Thickness / ImageThickness;

	Vector2 capOrigin = new Vector2(Art.HalfCircle.Width, Art.HalfCircle.Height / 2f);
	Vector2 middleOrigin = new Vector2(0, Art.LightningSegment.Height / 2f);
	Vector2 middleScale = new Vector2(tangent.Length(), thicknessScale);

	spriteBatch.Draw(Art.LightningSegment, A, null, color, rotation, middleOrigin, middleScale, SpriteEffects.None, 0f);
	spriteBatch.Draw(Art.HalfCircle, A, null, color, rotation, capOrigin, thicknessScale, SpriteEffects.None, 0f);
	spriteBatch.Draw(Art.HalfCircle, B, null, color, rotation + MathHelper.Pi, capOrigin, thicknessScale, SpriteEffects.None, 0f);
}
Here, Art.LightningSegment and Art.HalfCircle are static Texture2D variables holding the images of the pieces of the line segment. ImageThickness is set to the thickness of the line without the glow. In my image, it’s 8 pixels. We set the origin of the cap to the right side, and the origin of the middle segment to its left side. This will make them join seamlessly when we draw them both at point A. The middle segment is stretched to the desired width, and another cap is drawn at point B, rotated 180°.
XNA’s SpriteBatch class allows you to pass it a SpriteSortMode in its constructor, which indicates the order in which it should draw the sprites. When you draw the line, make sure to pass it a SpriteBatch with its SpriteSortMode set to SpriteSortMode.Texture. This is to improve performance.
Graphics cards are great at drawing the same texture many times. However, each time they switch textures, there’s overhead. If we draw a bunch of lines without sorting, we’d be drawing our textures in this order:
LightningSegment, HalfCircle, HalfCircle, LightningSegment, HalfCircle, HalfCircle, …
This means we’d be switching textures twice for each line we draw. SpriteSortMode.Texture tells SpriteBatch to sort the Draw() calls by texture so that all the LightningSegments will be drawn together and all the HalfCircles will be drawn together. In addition, when we use these lines to make lightning bolts, we’d like to use additive blending to make the light from overlapping pieces of lightning add together.
SpriteBatch.Begin(SpriteSortMode.Texture, BlendState.Additive);
// draw lines
SpriteBatch.End();
Step 2: Jagged Lines
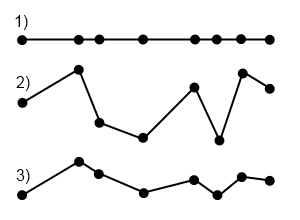
Lightning tends to form jagged lines, so we’ll need an algorithm to generate these. We’ll do this by picking points at random along a line, and displacing them a random distance from the line. Using a completely random displacement tends to make the line too jagged, so we’ll smooth the results by limiting how far from each other neighbouring points can be displaced.

The line is smoothed by placing points at a similar offset to the previous point; this allows the line as a whole to wander up and down, while preventing any part of it from being too jagged. Here’s the code:
protected static List<Line> CreateBolt(Vector2 source, Vector2 dest, float thickness)
{
	var results = new List<Line>();
	Vector2 tangent = dest - source;
	Vector2 normal = Vector2.Normalize(new Vector2(tangent.Y, -tangent.X));
	float length = tangent.Length();

	List<float> positions = new List<float>();
	positions.Add(0);

	for (int i = 0; i < length / 4; i++)
		positions.Add(Rand(0, 1));

	positions.Sort();

	const float Sway = 80;
	const float Jaggedness = 1 / Sway;

	Vector2 prevPoint = source;
	float prevDisplacement = 0;
	for (int i = 1; i < positions.Count; i++)
	{
		float pos = positions[i];

		// used to prevent sharp angles by ensuring very close positions also have small perpendicular variation.
		float scale = (length * Jaggedness) * (pos - positions[i - 1]);

		// defines an envelope. Points near the middle of the bolt can be further from the central line.
		float envelope = pos > 0.95f ? 20 * (1 - pos) : 1;

		float displacement = Rand(-Sway, Sway);
		displacement -= (displacement - prevDisplacement) * (1 - scale);
		displacement *= envelope;

		Vector2 point = source + pos * tangent + displacement * normal;
		results.Add(new Line(prevPoint, point, thickness));
		prevPoint = point;
		prevDisplacement = displacement;
	}

	results.Add(new Line(prevPoint, dest, thickness));

	return results;
}
The code may look a bit intimidating, but it’s not so bad once you understand the logic. We start by computing the normal and tangent vectors of the line, along with the length. Then we randomly choose a number of positions along the line and store them in our positions list. The positions are scaled between 0 and 1 such that 0 represents the start of the line and 1 represents the end point. These positions are then sorted to allow us to easily add line segments between them.
The loop goes through the randomly chosen points and displaces them along the normal by a random amount. The scale factor is there to avoid overly sharp angles, and the envelope ensures the lightning actually goes to the destination point by limiting displacement when we’re close to the end.

Step 3: Animation
Lightning should flash brightly and then fade out. To handle this, let’s create a LightningBolt class.
class LightningBolt
{
	public List<Line> Segments = new List<Line>();

	public float Alpha { get; set; }
	public float FadeOutRate { get; set; }
	public Color Tint { get; set; }

	public bool IsComplete { get { return Alpha <= 0; } }

	public LightningBolt(Vector2 source, Vector2 dest) : this(source, dest, new Color(0.9f, 0.8f, 1f)) { }

	public LightningBolt(Vector2 source, Vector2 dest, Color color)
	{
		Segments = CreateBolt(source, dest, 2);

		Tint = color;
		Alpha = 1f;
		FadeOutRate = 0.03f;
	}

	public void Draw(SpriteBatch spriteBatch)
	{
		if (Alpha <= 0)
			return;

		foreach (var segment in Segments)
			segment.Draw(spriteBatch, Tint * (Alpha * 0.6f));
	}

	public virtual void Update()
	{
		Alpha -= FadeOutRate;
	}

	protected static List<Line> CreateBolt(Vector2 source, Vector2 dest, float thickness)
	{
		// ...
	}

	// ...
}
To use this, simply create a new LightningBolt and call Update() and Draw() each frame. Calling Update() makes it fade. IsComplete will tell you when the bolt has fully faded out.
You can now draw your bolts by using the following code in your Game class:
LightningBolt bolt;
MouseState mouseState, lastMouseState;

protected override void Update(GameTime gameTime)
{
	lastMouseState = mouseState;
	mouseState = Mouse.GetState();

	var screenSize = new Vector2(GraphicsDevice.Viewport.Width, GraphicsDevice.Viewport.Height);
	var mousePosition = new Vector2(mouseState.X, mouseState.Y);

	if (MouseWasClicked())
		bolt = new LightningBolt(screenSize / 2, mousePosition);

	if (bolt != null)
		bolt.Update();
}

private bool MouseWasClicked()
{
	return mouseState.LeftButton == ButtonState.Pressed && lastMouseState.LeftButton == ButtonState.Released;
}

protected override void Draw(GameTime gameTime)
{
	GraphicsDevice.Clear(Color.Black);

	spriteBatch.Begin(SpriteSortMode.Texture, BlendState.Additive);

	if (bolt != null)
		bolt.Draw(spriteBatch);

	spriteBatch.End();
}
Step 4: Branch Lightning
You can use the LightningBolt class as a building block to create more interesting lightning effects. For example, you can make the bolts branch out as shown below:

To make the lightning branch, we pick random points along the lightning bolt and add new bolts that branch out from these points. In the code below, we create between three and six branches which separate from the main bolt at 30° angles.
class BranchLightning
{
	List<LightningBolt> bolts = new List<LightningBolt>();

	public bool IsComplete { get { return bolts.Count == 0; } }
	public Vector2 End { get; private set; }
	private Vector2 direction;

	static Random rand = new Random();

	public BranchLightning(Vector2 start, Vector2 end)
	{
		End = end;
		direction = Vector2.Normalize(end - start);
		Create(start, end);
	}

	public void Update()
	{
		bolts = bolts.Where(x => !x.IsComplete).ToList();
		foreach (var bolt in bolts)
			bolt.Update();
	}

	public void Draw(SpriteBatch spriteBatch)
	{
		foreach (var bolt in bolts)
			bolt.Draw(spriteBatch);
	}

	private void Create(Vector2 start, Vector2 end)
	{
		var mainBolt = new LightningBolt(start, end);
		bolts.Add(mainBolt);

		int numBranches = rand.Next(3, 6);
		Vector2 diff = end - start;

		// pick a bunch of random points between 0 and 1 and sort them
		float[] branchPoints = Enumerable.Range(0, numBranches)
			.Select(x => Rand(0, 1f))
			.OrderBy(x => x).ToArray();

		for (int i = 0; i < branchPoints.Length; i++)
		{
			// Bolt.GetPoint() gets the position of the lightning bolt at specified fraction (0 = start of bolt, 1 = end)
			Vector2 boltStart = mainBolt.GetPoint(branchPoints[i]);

			// rotate 30 degrees. Alternate between rotating left and right.
			Quaternion rot = Quaternion.CreateFromAxisAngle(Vector3.UnitZ, MathHelper.ToRadians(30 * ((i & 1) == 0 ? 1 : -1)));
			Vector2 boltEnd = Vector2.Transform(diff * (1 - branchPoints[i]), rot) + boltStart;
			bolts.Add(new LightningBolt(boltStart, boltEnd));
		}
	}

	static float Rand(float min, float max)
	{
		return (float)rand.NextDouble() * (max - min) + min;
	}
}
Step 5: Lightning Text
Below is a video of another effect you can make out of the lightning bolts:
First we need to get the pixels in the text we’d like to draw. We do this by drawing our text to a RenderTarget2D and reading back the pixel data with RenderTarget2D.GetData<T>(). If you’d like to read more about making text particle effects, I have a more detailed tutorial here.
We store the coordinates of the pixels in the text as a List<Vector2>. Then, each frame, we randomly pick pairs of these points and create a lightning bolt between them. We want to design it so that the closer two points are to one another, the greater the chance that we create a bolt between them. There’s a simple technique we can use to accomplish this: we’ll pick the first point at random, and then we’ll pick a fixed number of other points at random and choose the nearest.
The number of candidate points we test will affect the look of the lightning text; checking a larger number of points will allow us to find very close points to draw bolts between, which will make the text very neat and legible, but with fewer long lightning bolts between letters. Smaller numbers will make the lightning text look more crazy but less legible.
public void Update()
{
	foreach (var particle in textParticles)
	{
		float x = particle.X / 500f;
		if (rand.Next(50) == 0)
		{
			Vector2 nearestParticle = Vector2.Zero;
			float nearestDist = float.MaxValue;
			for (int i = 0; i < 50; i++)
			{
				var other = textParticles[rand.Next(textParticles.Count)];
				var dist = Vector2.DistanceSquared(particle, other);

				if (dist < nearestDist && dist > 10 * 10)
				{
					nearestDist = dist;
					nearestParticle = other;
				}
			}

			if (nearestDist < 200 * 200 && nearestDist > 10 * 10)
				bolts.Add(new LightningBolt(particle, nearestParticle, Color.White));
		}
	}

	for (int i = bolts.Count - 1; i >= 0; i--)
	{
		bolts[i].Update();

		if (bolts[i].IsComplete)
			bolts.RemoveAt(i);
	}
}
Step 6: Optimization
The lightning text, as shown above, may run smoothly if you have a top of the line computer, but it’s certainly very taxing. Each bolt lasts over 30 frames, and we create dozens of new bolts each frame. Since each lightning bolt may have up to a couple hundred line segments, and each line segment has three pieces, we end up drawing a lot of sprites. My demo, for instance, draws over 25,000 images each frame with optimizations turned off. We can do better.
Instead of drawing each bolt until it fades out, we can draw each new bolt to a render target and fade out the render target each frame. This means that, instead of having to draw each bolt for 30 or more frames, we only draw it once. It also means there’s no additional performance cost for making our lightning bolts fade out more slowly and last longer.
First, we’ll modify the LightningText class to only draw each bolt for one frame. In your Game class, declare two RenderTarget2D variables: currentFrame and lastFrame. In LoadContent(), initialize them like so:
lastFrame    = new RenderTarget2D(GraphicsDevice, screenSize.X, screenSize.Y, false, SurfaceFormat.HdrBlendable, DepthFormat.None);
currentFrame = new RenderTarget2D(GraphicsDevice, screenSize.X, screenSize.Y, false, SurfaceFormat.HdrBlendable, DepthFormat.None);
Notice the surface format is set to HdrBlendable. HDR stands for High Dynamic Range, and it indicates that our HDR surface can represent a larger range of colors. This is required because it allows the render target to have colors that are brighter than white. When multiple lightning bolts overlap we need the render target to store the full sum of their colors, which may add up beyond the standard color range. While these brighter-than-white colors will still be displayed as white on the screen, it’s important to store their full brightness in order to make them fade out correctly.
Each frame, we first draw the contents of the last frame to the current frame, but slightly darkened. We then add any newly created bolts to the current frame. Finally, we render our current frame to the screen, and then swap the two render targets so that for our next frame, lastFrame will refer to the frame we just rendered.
void DrawLightningText()
{
	GraphicsDevice.SetRenderTarget(currentFrame);
	GraphicsDevice.Clear(Color.Black);

	// draw the last frame at 96% brightness
	spriteBatch.Begin(0, BlendState.Opaque, SamplerState.PointClamp, null, null);
	spriteBatch.Draw(lastFrame, Vector2.Zero, Color.White * 0.96f);
	spriteBatch.End();

	// draw new bolts with additive blending
	spriteBatch.Begin(SpriteSortMode.Texture, BlendState.Additive);
	lightningText.Draw();
	spriteBatch.End();

	// draw the whole thing to the backbuffer
	GraphicsDevice.SetRenderTarget(null);
	spriteBatch.Begin(0, BlendState.Opaque, SamplerState.PointClamp, null, null);
	spriteBatch.Draw(currentFrame, Vector2.Zero, Color.White);
	spriteBatch.End();

	Swap(ref currentFrame, ref lastFrame);
}

void Swap<T>(ref T a, ref T b)
{
	T temp = a;
	a = b;
	b = temp;
}
Step 7: Other Variations
We’ve discussed making branch lightning and lightning text, but those certainly aren’t the only effects you can make. Let’s look at a couple other variations on lightning you may way to use.
Moving Lightning
Often you may want to make a moving bolt of lightning. You can do this by adding a new short bolt each frame at the end point of the previous frame’s bolt.
Vector2 lightningEnd = new Vector2(100, 100);
Vector2 lightningVelocity = new Vector2(50, 0);

void Update(GameTime gameTime)
{
	Bolts.Add(new LightningBolt(lightningEnd, lightningEnd + lightningVelocity));
	lightningEnd += lightningVelocity;

	// ...
}
Smooth Lightning
You may have noticed that the lightning glows brighter at the joints. This is due to the additive blending. You may want a smoother, more even look for your lightning. This can be accomplished by changing your blend state function to choose the max value of the source and destination colors, as shown below.
private static readonly BlendState maxBlend = new BlendState()
{
		AlphaBlendFunction = BlendFunction.Max,
		ColorBlendFunction = BlendFunction.Max,
		AlphaDestinationBlend = Blend.One,
		AlphaSourceBlend = Blend.One,
		ColorDestinationBlend = Blend.One,
		ColorSourceBlend = Blend.One
};
Then, in your Draw() function, call SpriteBatch.Begin() with maxBlend as the BlendState instead of BlendState.Additive. The images below show the difference between additive blending and max blending on a lightning bolt.


Of course max blending won’t allow the light from multiple bolts or from the background to add up nicely. If you want the bolt itself to look smooth, but also to blend additively with other bolts, you can first render the bolt to a render target using max blending, and then draw the render target to the screen using additive blending. Be careful not to use too many large render targets as this will hurt performance.
Another alternative, which will work better for large numbers of bolts, is to eliminate the glow built into the line segment images and add it back using a post-processing glow effect. The details of using shaders and making glow effects are beyond the scope of this tutorial, but you can use the XNA Bloom Sample to get started. This technique will not require more render targets as you add more bolts.
Conclusion
Lightning is a great special effect for sprucing up your games. The effects described in this tutorial are a nice starting point, but it’s certainly not all you can do with lightning. With a bit of imagination you can make all kinds of awe-inspiring lightning effects! Download the source code and experiment with your own.
If you enjoyed this article, take a look at my tutorial about 2D water effects, too.