Particle effects are very common in games – it’s hard to find a modern game that doesn’t use them. In this tutorial we’re going to take a look how to build a fairly complex particle engine and use it to create a fun snowy scene. Put your woolly hat on and let’s begin.
Note: Although this tutorial is written using AS3 and Flash, you should be able to use the same techniques and concepts in almost any game development environment.
Final Result Preview
Click and drag the mouse to interact with the snow effect.
No Flash? Check out this video of the demo on YouTube:
Setup
The demo implementation above uses AS3 and Flash, with the Starling Framework for GPU accelerated rendering. A pre-rendered image of 3D scene (available in the source download) will be used as a background. In the middle layers we’ll place particle effects, and the whole scene will be multiplied by a texture representing light attribution.
Particle Effects
In games we often have to simulate various visual and motion phenomena, and frequently need to display dynamic visual effects such as fire, smoke and rain. There are multiple ways we can do this; a common method is to use particle effects.
This involves using lots of small elements – usually images oriented to face the camera – but they could be done using 3D models as well. The main goal is to update the position, scale, color and other properties of a group of many particles (perhaps several thousand). This will create an illusion of how the effect looks in real life.
In this tutorial we’ll simulate two effects: a snow effect which will consist of many flake sprites, affected by the wind and gravity, and a subtle fog effect which will use a handful of big smoke sprites.
Implementing Emitters, Colliders and Force Sources
Typical particle effects consist of one or more particle emitters. An emitter is the place where particles originate from; it can take various shapes and have different behaviors. It adds the initial position and angle of particles, and can also define other starting parameters, such as initial velocity.
We’ll create one type of emitter, a box emitter, which will spawn particles within – you’ve guessed it – a box that we define.
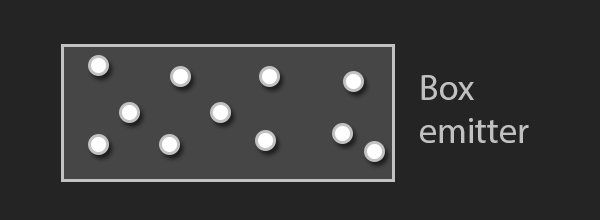
To make it easy for us to add more emitters, we’ll use a programming construct called an interface which defines that the class implementing it has to have a defined set of methods. In our case, we’ll require just one method:
function generatePosition():Point
Implementing this in the box emitter is super simple; we take a random point between the minimum and maximum points which define the box:
          public function generatePosition():Point {
               var randomX:Number = Math.random() * (maxPoint.x - minPoint.x) + minPoint.x;
               var randomY:Number = Math.random() * (maxPoint.y - minPoint.y) + minPoint.y;
               return new Point(randomX, randomY);
          }
To make this example more interesting and a bit more advanced we’ll add the concept of: a collider and force sources.
A collider will be an object consisting of one or more geometry definitions, which can be attached to a particle emitter. When a particle has an interaction with collider (that is, when it enters the geometry) we’ll get an event to decide what we would like to do. This will be used to stop snow flakes from moving when they collide with the ground.
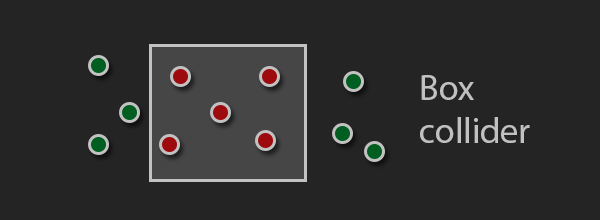
In the same manner as with the emitters we’ll use an interface which requires us to implement the following function:
function collides(x:Number, y:Number):Boolean;
Note: this is a simple implementation, so we are taking just the position into account when checking for collision.
The implementation of the box collider is straightforward; we check whether the point is within the bounds of the box:
          public function collides(x:Number, y:Number):Boolean {
               var xInBounds:Boolean = this.minPoint.x < x && this.maxPoint.x > x;
               var yInBounds:Boolean = this.minPoint.y < y && this.maxPoint.y > y;
               return xInBounds && yInBounds;
          }
The other type of object we’ll introduce is a force source. This will have an effect on a particle’s velocity based on its parameters and the particle’s position and mass.
The simplest source will be called the directional force source, and we’ll define it with a single vector D (used for the force direction and strength). It doesn’t take particles’ positions into account; it just applies the force on all the particles from that effect. With this we’ll be able to simulate gravity and wind – for wind the direction will vary in time in order to feel more realistic.
Another type of force source will depend on the distance between a defined point and particles, getting weaker further away from the center. This source will be defined by its position P and strength factor S. We’ll use this to enable mouse interaction with the snow.
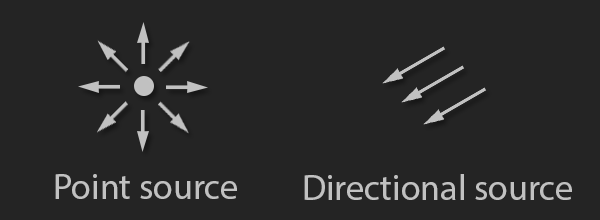
Types of force sources we’ll create
The force sources will have their own interface, requiring the following method to be implemented:
function forceInPoint(x:Number, y:Number):Point;
This time, however, we have multiple implementations: one for a direction force source and one for a point force source.
The direction force source implementation is the simpler of the two:
          public function forceInPoint(x:Number, y:Number):Point
          {
               /// Each particle gets the same force
               return new Point(forceVectorX, forceVectorY);
          }
This is the point force source implementation:
          /// x. y are the position of the particle
          public function forceInPoint(x:Number, y:Number):Point {
               /// Direction and distance
               var differenceX:Number = x - positionX;
               var differenceY:Number = y - positionY;

               var distance:Number = Math.sqrt(differenceX * differenceX + differenceY * differenceY);

               /// Falloff value which will reduce force strength
               var falloff:Number = 1.0 / (1.0 + distance);

               /// We normalize the direction, and use falloff and strength to calculate final force
               var forceX:Number = differenceX / distance * falloff * strength;
               var forceY:Number = differenceY / distance * falloff * strength;

               return new Point(forceX, forceY);
          }
Note that this method will be called continually. This enables us to change force parameters when the effect is active. We’ll use this feature to simulate the wind and add mouse interactivity.
Effect and Particle Implementation
The main part of the implementation is in the Effect class, which is responsible for spawning and updating particles.
The amount of particles to spawn will be determined by the spawnPerSecond value in the update method:
                    _spawnCounter -= time;

                    /// Using a loop to spawn multiple particles in a frame
                    while (_spawnCounter <= 0) {
                         /// Spawn the number of particles according to the passed time
                         _spawnCounter += (1 / _spawPerSecond) * time;
                         spawnParticle();
                    }
Updating is a bit more complex. First the implementation updates the forces, then it calls the particle simulation update and checks for collisions. It is also responsible for removing particles when they are not needed any more.
               var i:int = 0;

               /// using while loop so we can remove the particles from the container
               while (i < _particles.length) {
                    var particle:Particle = _particles[i];

                    /// Calculate particle accleration from all forces
                    particle.acceleration = calculateParticleAcceleration(particle);

                    /// Simulate particle
                    particle.update(time);

                    /// Go through the colliders and report collisions
                    if (_colliders && _collisionResponse != null) {
                         for each (var collider:ICollider in _colliders) {
                              if (collider.collides(particle.x, particle.y)) {
                                   _collisionResponse(particle, collider);
                              }
                         }
                    }

                    /// remove particle if it's dead
                    if (particle.isDead) {
                         _particles.splice(i, 1);
                         addParticleToThePool(particle);
                         particle.removeFromParent();
                    }
                    else {
                         /// We are in the while loop and need to increment the counter
                         i++;
                    }
               }
I’ve not yet mentioned the most important part of the implementation: how we represent particles. The Particle class will inherit from an object we can display (image) and have some properties that will effect its change during the update:
startingLife– how long a particle can stay alive.movable– whether the particle’s position be changed (used to freeze particle in place).velocity– how much the particle will move in a set amount of time.acceleration– how much the particle’s velocity will change in a set amount of time.angularVelocity– how fast the rotation changes in a set amount of time.fadeInOut– whether we use a fading alpha value to smoothly create and destroy the particle.alphaModifier– determines the base alpha value.mass– the physical mass of the particle (used when calculating acceleration from forces).
Each particle has an update function which is called with time delta (dt). I would like to show the part of that function dealing with the updating of particle position, which is common in games:
                    /// update position with velocity
                    x += _velocity.x * dt;
                    y += _velocity.y * dt;

                    /// update velocity whith acceleration
                    _velocity.x += _acceleration.x * dt;
                    _velocity.y += _acceleration.y * dt;
This is done using Euler integration and it has accuracy errors, but since we are using it just for visual effects these won’t bother us. If you are doing physics simulations important to the gameplay you should look into other methods.
Example Effects
Finally we have come to the point where I’ll explain how to implement the actual effect. To make a new effect we’ll extend the Effect class.
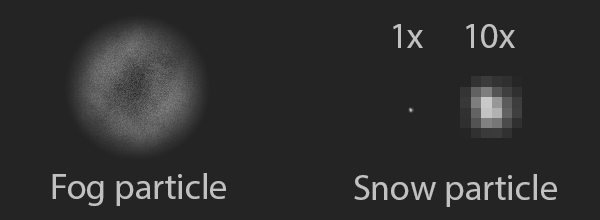
Particle textures
Let It Snow
We’ll start with the snow effect. First, place a box emitter on top of the screen, and use it to spawn quite a few particles. A collider will be used to detect whether a particle has reached the floor, in which case we’ll set its movable property to false.
The important thing we have to ensure is that the particles are random enough so that they don’t create visible patterns on the screen, which damages the illusion. We do this in a couple of ways:
- Random starting velocity – each particle will move in slightly different way.
- Random scale – other than sizes being different, this also adds more depth to the effect making it look more 3D.
- Random rotation – effectively makes each particle look unique even though they use the same image.
We initialize each snow particle in this way:
                    particle.fadeInOut = true;

                    /// Life [3, 4> seconds
                    particle.startingLife = 3 + Math.random();

                    /// Small amount of starting velocity
                    particle.velocity = Point.polar(30, Math.random() * Math.PI * 2.0);

                    /// Random rotation [0, 360> degrees
                    particle.rotation = Math.PI * 2.0 * Math.random();

                    /// Random scale [0.5, 1>
                    particle.scaleX = particle.scaleY = Math.random() * 0.5 + 0.5;
To give them realistic motion of falling from the sky we'll use a directional force source as gravity. It would be too easy to stop here, so we are going to add another directional force to simulate wind, which will vary in time.
               /// -20 is arbitrary number which worked well when testing
               /// (9.81m/s/s is the actual acceleration due to gravity on Earth)
               var gravity:DirectionalField = new DirectionalField(0, -9.81 * -20);

               /// Initialization is not important; values will change in time
               _wind = new DirectionalField(1, 0);

               /// set forces to the effect
               this.forces = new <IForceField>[gravity, _wind];
We’ll vary the wind value using a sine function; this was mostly determined through experimentation. For the x-axis we raise sine to the power of 4, making its peak sharper. Every six seconds there will be a peak, producing the effect of a strong gust of wind. On the y-axis wind will quickly oscillate between -20 and 20.
               /// Calculate wind force
               _counter += time;

               _wind.forceVectorX = Math.pow(Math.sin(_counter) * 0.5 + 0.5, 4) * 150;
               _wind.forceVectorY = Math.sin(_counter * 100) * 20;
Take a look at the function plot to get a better understanding of what is going on.

The x-axis represents time; the y-axis represents wind velocity. (Not to scale.)
Add Some Fog
To complete the effect we’re going to add a subtle fog effect, using a box emitter that covers the whole scene.
Since the texture we’ll use for the particle is relatively big, the emitter will be set to spawn a small number of particles. The alpha level of the particle will from the beginning be low to prevent it from completely obscuring the scene. We’ll also set them to rotate slowly, in order to simulate a wind effect.
               /// Cover large portion of the screen
               this.emitter = new Box(0, 40, 640, 400);

               /// We want just a few of the particles on screen at a time
               this.spawnPerSecond = 0.05;

               this.setupParticle = function(particle:Particle):void {
                    /// Move slowly in one direction
                    particle.velocity = Point.polar(50, Math.random() * Math.PI * 2.0);

                    particle.fadeInOut = true;

                    /// [3, 4> seconds of life
                    particle.startingLife = 3 + Math.random();

                    particle.alphaModifier = 0.3;

                    /// Random rotation [0, 360> degrees
                    particle.rotation = Math.PI * 2.0 * Math.random();

                    /// Rotate <-0.5, 0.5] radians per second
                    particle.angularVelocity = (1 - Math.random() * 2) * 0.5;

                    /// Set the scale to [1, 2>
                    particle.scaleX = particle.scaleY = Math.random() + 1;

               };
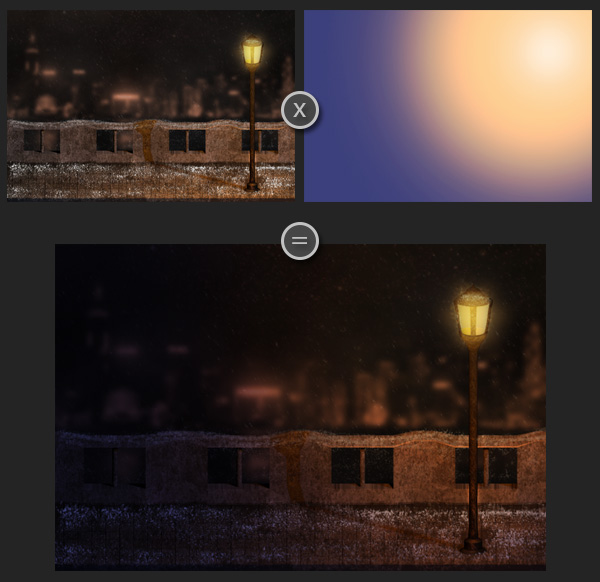
To add a bit more atmosphere to the example, I've added a light texture which will be on the top scene layer; its blending will be set to Multiply. The particle effects will now be much more interesting, since their base white color will be changed to match the light, and the scene as a whole will feel more integrated.
Improving Performance
A common way to optimize the simulation of a lot of particles is to use the concept of pooling. Pooling enables you to reuse objects which have already been created, but are no longer needed.
The concept is simple: when we are finished with a certain object, we put it in a "pool"; then, when we need another object of the same type, we first check to see if a "spare" on is in the pool. If it is, we just take it and apply new values to it. We can insert a certain number of these objects in the pool at the start of the simulation to prepare them for later.
Tip: You can find more detailed information about pooling in this article.Another way we can optimize particle effects is by precomputing them to a texture. By doing this you'll lose a lot of flexibility, but the advantage is that drawing an effect would be the same as drawing a single image. You would animate the effect in the same manner as a regular sprite sheet animation.
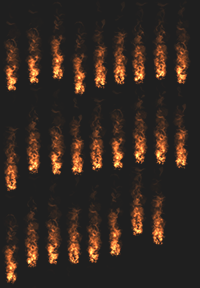
Fire particle effect in sprite sheet form
However, you need to be careful: this is not well suited for full-screen effects like snow, since they would take a lot of memory.
A cheaper way to simulate snow would be to use a texture with multiple flakes inside, and then do a similar simulation to the one we did, but using far less particles. This can be made to look good, but takes additional effort.
Here is an example of that (from the intro scene of Fahrenheit, aka Indigo Prophecy):
Final Thoughts
Before you start writing your own particle engine, you should check whether the technology you are using to make your game already features particle effects, or whether a third party library exists. Still, it's really useful to know how they are implemented, and when you have a good understanding of that, you shouldn't have trouble using a particular variant, since they are implemented in similar fashion. Particle engines can even come with editors that provide a WYSIWYG way to edit their properties.
If the effect you need can be pulled of in a sprite sheet based particle effect, I would recommend TimelineFX. It can be used to create stunning effects quickly, and has a big library of effect you can use and modify. Unfortunately, it's not the most intuitive tool, and hasn't been updated in a while.
