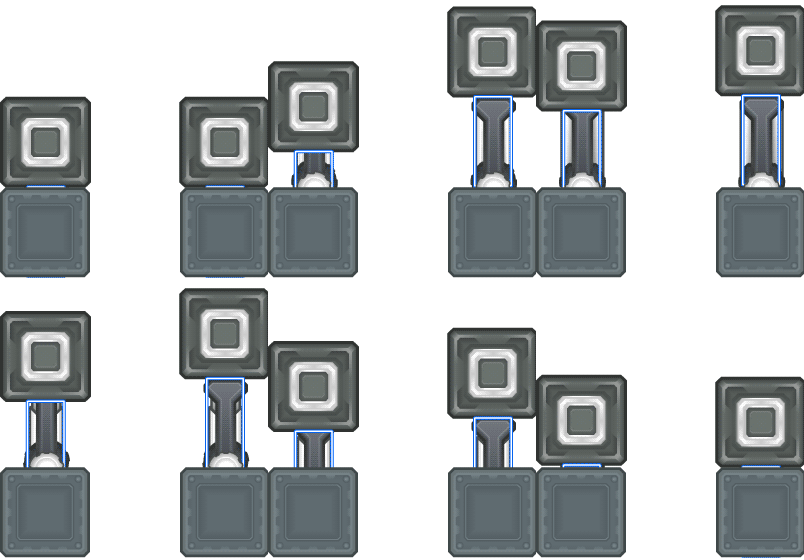
So you’ve got your awesome game in the works, it’s got all sorts of complex physics, epic enemy AI or what-have-you. But it feels lifeless. You want some OOMPH, you want some animation!
So if you go and look up how to animate, the first answer you come across will most likely be a method using spritesheets and blitting. In fact, almost all tutorials on the web talk about nothing but blitting, as if there’s no other way to animate. But in my experience, there’s a better way to animate your orcs and goblins!
This method could be called animating with asset-sheets – or more technically, tweening with asset-sheets – as opposed to using sprite-sheets. Before we get into exactly what this means, let’s consider an important question:
What’s Wrong With Blitting?
Below are some reasons as to why you would not want to use blitting in certain cases.
1. It Takes a Lot of Space
Whether we’re talking about RAM or disk space, sprite sheets can easily clog things up. Especially if you’re trying to make HD graphics. Huge sprite sheets may have to be split into multiple PNGs, taking up precious RAM and skyrocketing your game’s size if you’re not careful.
2. It’s Not Dynamic
What happens when you want to speed up an animation? You could skip some frames, but what about slowing down? The animation would look choppy and ugly. Even if you want to only support 60 fps, what if a computer can run the game faster? You could have jaw-droppingly smooth animations at higher frame rates with no extra work, and it would also look good if you chose to change the game’s frame rate at any time.
And what if you wanted something to happen when the player’s arms reached some place? Or to have him pick up something? You’d need to manually mark his arm throughout the animation, which may be time-consuming as you can’t get any data about where any of his limbs are from a sprite sheet.
3. It Doesn’t Allow You to Make Transitions
What happens when the player is running and suddenly jumps? It cuts to the jump animation right away. This looks choppy, and this would happen every time the animation transitions to a new state. You’d have to make a transition for every pair of animations you have, which is not only insanely time consuming, but also has the adverse effect of increasing your RAM usage as discussed earlier.
The Alternative
Using asset-sheets not only allows the animations to be dynamic and scale up with any FPS, as well as transitioning smoothly between any two states, but also takes a tiny tiny amount of disk space and RAM compared to blitting!
This isn’t even very new. Some popular games use it, like the recently popular Closure. Its only limitation is that it can’t do frame-by-frame (FBF) animation, since it relies on tweening – so if you have complex explosions, you’ll have to use sprite sheets.
But for a lot of cases, you’ll find you won’t need to, and it’s more than worth the effort to have a system like this for your game, as some games could rely completely on this, shaving off a ton of overhead. It’s also really cool because it’s similar to how you might animate a 3D game!
So to summarize:
Let’s Dive Right In
This is a character and his asset sheet.

As the name implies, an asset sheet is a PNG with all the limbs/assets of the character or object separated.
And here is the animation data in JSON (of course, you can use whichever format you prefer to work with):
//this snippet shows the first three frames of the "Body" animation
"-name":"Body",
"Frame": [
{
	"-x":"0.65",
	"-y":"-64.45",
	"-rotation":"0.000"
},
{
	"-x":"2.45",
	"-y":"-64.45",
	"-rotation":"0.279"
},
	"-x":"3.30",
	"-y":"-64.05",
	"-rotation":"0.707"
}
Now combining these two together in an awesome engine, you get:

And unlike a blitted animation, this could speed down or up, or transition very smoothly. So this is what we'll be doing.
Step 1: Exporting Your Asset Sheet
The first step is to get your asset-sheet ready. You can do this in any number of ways. The point is to end up with a sheet containing the assets and a data file containing the positions of the assets in the sheet. This is the exact same method as for making a spritesheet, except in lieu of sprites you add separate assets.
Export your player's limbs and pieces as individual PNGs, then use a program like Texture Packer to group them into a sheet. There are other programs, but I personally prefer Texture Packer because of how versatile and feature-rich it is.
Tip: Whatever software you use to make your sheets , make sure there is at least 2px of padding between each asset and 1px extrusion. This will prevent some nasty problems in the future.Step 2: Exporting Your Animation Data
This is arguably the most important step, because this is going to be the data you use to create all the animations at run-time. It's also important because it's platform-independent. You can use the same animation data on a PS3 as you would on an iPhone.
The data you need is the x-position, y-position, rotation value, and other such properties of every asset for every frame of your animation.
If you're using Adobe Flash to animate, you can easily export your animation data. In theory, all you need to do is loop through the MovieClip's children, and step through the frames while getting the data.
However, this can be a nuisance. Thankfully, there are tools that do this already. For example, Grapefrukt is an awesome tool that has a variety of features, including exporting spritesheets as well as animation data in XML.
Note: You need to make sure that the names of your assets in the data correspond with the names in the asset sheet so they can easily be linked.If you're trying to modify it, or if you just want the simple feature of exporting animation, you can opt to use my own animation exporter class, which automatically exports animation data in a JSON file in the same directory. You can download it here, along with an example asset sheet, and an example animation.
If you're using other animation software (or your own) it shouldn't be too hard to find or write a plugin that exports the coordinates and data of the assets at every frame.
Here is a list of all the attributes the Flash exporters output for every asset:
xandyrotation(in degrees or radians)scaleXandscaleY(how much the asset is scaled on each axis)alpha(transparency)colorMatrix(allows you to export data such as brightness, hue, and contrast)
There's no limit to how much data you can output. For example, I added an extra depth field in my exporter that tells me the depth of every asset. So that if the animator arranges the assets in a certain order, or changes the layers, they get updated automatically in the engine.
So as you can see, you can do a lot of different kinds of animation and features with the right data.
Step 3: Parsing the Data
So now you've got your asset sheet, its data file and animation JSON ready. Next comes the hard part: writing the animation system that understands our data and converts the separate assets and raw data into beautiful animation.
The first step is to load the animation data. This should be easy since most languages have a JSON or XML parser.
Then you splice each asset out of the sheet (or rather, only render the rectangle with your asset) and store them in an array.
So now our game objects have two arrays: an assetArray that has the actual assets, and an animationArray which has the animation data.
animationArray and give the assets names. This is so that you can easily access the correct data from the animation array - so if I print the value of object.assetArray[5].name, I would get "leg", for example. Then if I go and access object.animationArray["leg"], I should get the animation data for the character's leg.Now let's see some code!
///Inside the object's update function
var animationArray:Array = object.animationArray;
var assetArray:Array = object.assetArray;

//we loop through all the assets
for (var i:int = 0; i < assetArray.length; i++){
    assetArray[i].x = object.x;
    assetArray[i].y = object.y;
    assetArray[i].angle = object.angle;
}
So far we're looping through all the assets to set their x, y and rotation to that of the mother object. This is important so that you can have your objects move without ruining the animation, so that the animation coordinates are relative to that point.
///Inside the object's update function
var animationArray:Array = object.animationArray;
var assetArray:Array = object.assetArray;

//we loop through all the assets
for(var i:int = 0;i<assetArray.length;i++){
    assetArray[i].x = object.x + animationArray[assetArray[i].name][currentFrame].x;
    assetArray[i].y = object.y + animationArray[assetArray[i].name][currentFrame].y;
    assetArray[i].angle = object.angle + animationArray[assetArray[i].name][currentFrame].rotation;
}
Here we added the line + animationArray[assetArray[i].name][currentFrame].x, where currentFrame is an integer representing the current frame you're in.
Now all of the assets would be at their first frame positions, so once you increment currentFrame, they would be at the positions of Frame 2, and so on.
Congratulations, you've created animation! It looks identical to how if you had done it with a spritesheet, except it only cost you a few kilobytes instead of megabytes.
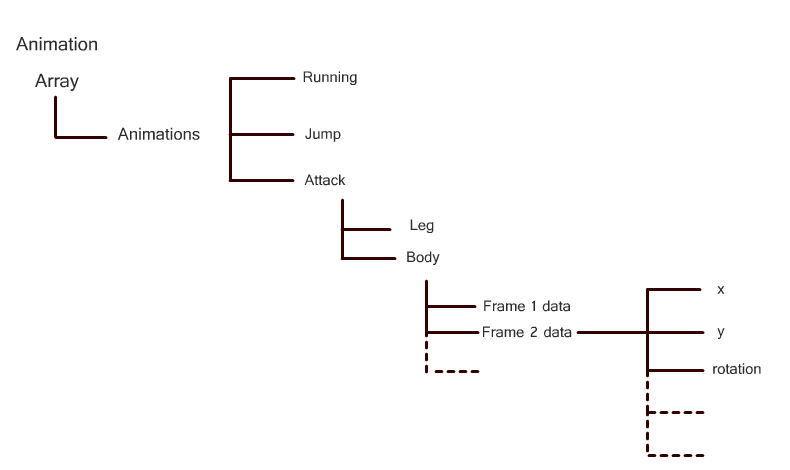
This is just a very simple example. Normally you'd want to have separate animations, such as a "running" animation with 30 frames, and a "jump" animation with 12 frames. To do this you'd just add another layer to your animation array hierarchy so that it looks something like this:

Step 4: Interpolation
We don't have to stop there. We want to try making our animations as smooth and dynamic as promised.
Normally this would be something rather difficult - we'd have to store the complete state of the previous frame in order to interpolate to the current. But thankfully, our system already stores that information!
You always know whether the previous frame was, and where the next frame is going to be. so interpolating between frames is as simple as this:
var data:Array = animationArray[assetArray[i].name]
var X:Number = data[currentFrame].x
               + (data[currentFrame+1].x - data[currentFrame].x) * _timeFactor;
assetArray[i].x = object.x + X
Here we get the difference between the next frame and the current frame, multiplied by a timeFactor which is the time between the two frames.
This means that instead of your animation looking like this in slow motion:


...it would look like this:


Take that, blitting!
Bonus Step: Color Matrix
If you're using Flash to animate, your color matrix may look something like this:
{1,0,0,0,0,0,1,0,0,0,0,0,1,0,0,0,0,0,1,0}
Not very legible now is it?
Flash stores all the brightness, contrast and saturation data there. Thankfully, they posted their formula up so we don't have to try and reverse engineer this.
The below formula tells you how to calculate the final RGBA values of the pixel given the source color and the color matrix (a is the color matrix array):
redResult = (a[0] * srcR) + (a[1] * srcG) + (a[2] * srcB) + (a[3] * srcA) + a[4]
greenResult = (a[5] * srcR) + (a[6] * srcG) + (a[7] * srcB) + (a[8] * srcA) + a[9]
blueResult = (a[10] * srcR) + (a[11] * srcG) + (a[12] * srcB) + (a[13] * srcA) + a[14]
alphaResult = (a[15] * srcR) + (a[16] * srcG) + (a[17] * srcB) + (a[18] * srcA) + a[19]
More information on Flash's ColorMatrix class can be found here.
Conclusion and Case Study
Although it might seem a bit scary at first, this method is really easy to use when everything is set up, and setting up a proper basis is worth some time and effort.
That's not to say this method is ideal for every situation. As mentioned before, if your game relies on frame-by-frame animation or things that can't be done with tweening, then this wouldn't really work. (Although you could always mix and match methods.)
With that said, let's take a look at a final real world example of the use of this method.
This is a door:

It opens and closes, and you want the player to not be able to get through it.
It's simple, right? You'd just have a collision box move vertically, depending on how many frames through the animation is. The problem, however, is that this animation is not linear: there is some slight easing. Matching the collision box's vertical position to the animation's current frame would make the collision box not sync up with the animation, making things look like they either go through the door, or stand on thin air.
Thankfully, you have the x, y, height and width of the animated door asset, enabling you to perfectly sync your collision!

Blitting vs asset sheets