Image palettes have been used in computer graphics from the beginning and, even though they are rarely found in modern games, a certain class of problems would be practically impossible without them. In this tutorial we’re going to build a MMO character designer for a 2D game using palettes, multi-texturing and shaders.
Note: Although this tutorial is written using AS3 and Flash, you should be able to use the same techniques and concepts in almost any game development environment.
The character model used for the demo was made by Dennis Ricardo Díaz Samaniego, and can be found here: Leviathan. The rig was made by Daren Davoux and can be found here: Leviathan Rigged.
Final Result Preview
Click a section of the character model, and then click anywhere in the color picker. Can’t see the SWF above? Check out this video instead:
The full source files are available in the source download.
Setup
The demo implementation uses AS3 and Flash, with the Starling library for GPU accelerated rendering and the Feathers library for the UI. Our initial scene contains an image of the character and the color picker, which will be used to change colors of the character palette.
Palettes in Games
Representing colors using palettes was common in early games because of hardware requirements. This technique would map a value from an image to another value in a palette. Usually the image would have a smaller set of values, to save the memory, and be used to look up the real value in the palette.
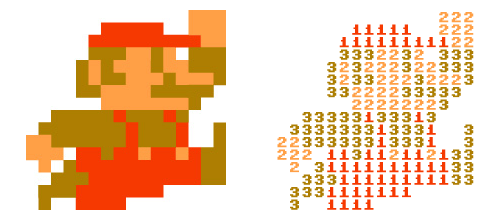
The Mario sprite below isn’t made up of red, orange, and brown – it’s made up of 1, 2, and 3. When Mario picks up a fire flower, the palette changes so that 1 represents white and 3 represents red. Mario looks different, but his sprite doesn’t actually change.

Since the use of 24-bit true-color image representation has been common for more than a decade you may be wondering how this technique could be useful today. The first obvious use case is in making retro games, but it’s rarely the case that you need to use palettes there. An artist can limit himself to a certain set of colors, but still use the full 24-bit spectrum, since that’s an easy way to handle textures in modern hardware.
One technique used during the days of palette images was palette swapping: this was used to change the existing image to a different color scheme. And many of you may remember how tiers of monsters in old RPGs were just colored differently; this saved time for artists and used less memory, allowing for a greater variety of monster designs. (Arguably this could cause the game to seem repetitive, though.)
This brings us to the goal of this tutorial, which is to let you have more variety in your game’s assets. We’ll simulate a MMO character creator, with customizable colors for character parts, using a palette.
Making Paletted Images
Making paletted images is a bit more difficult than making regular images. There are a few limitations and technical details to watch out for.
First off: palettes have a limited scope; in this tutorial, each character sprite has 8 bits — that’s 256 possible values — of which the value ’255′ will be used to denote ‘transparent’.
For pixel art this is not much of a problem since it’s usually based on a limited palette chosen by an artist. While you are drawing, palette colors are defined and applied to the image.
The image on the right has a modified palette which would be displayed at night time in the game.
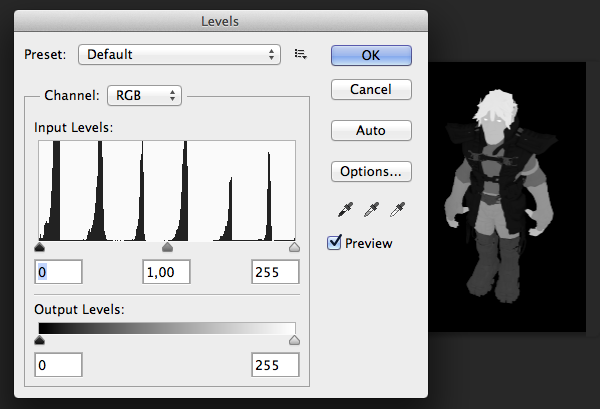
In the example I’m using a 3D model; I rendered this in separate layers, then mapped each layer to the spectrum of a palette. This can be done manually by editing the image’s levels to fit the in desired part of the palette. Those parts of the palette we’ll represent as small gradients, to enable mapping from shadows to highlights.

The Levels panel clearly displays how each character component takes a segment of image values.
This will reduce the overall image depth of an image. If you are doing a cartoony game (cel shaded) this can be fine, but you may find it lacking for a more realistic style. We can somewhat remedy this by sacrificing memory while increasing the depth of an image to 16 bits – the palette could stay the same size, and we’d use interpolation to provide us with more variety.
Implementation
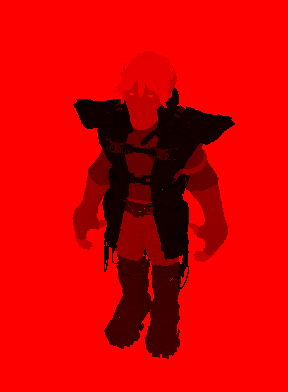
Our implementation uses a single 8-bit channel texture for the character. For simplicity, we’ll do this using a regular PNG image, whose green and blue channels are set to 0, and everything is stored in the red channel (which is why the example image is in red). Depending on your platform you can save it in an appropriate single channel format. An initial palette is saved as a 1D image, with a width of 256 to represent all of the values we’ll map.

Main character image.

Starting palette for character in our example.
The main part is not that complicated. We are going to look up certain values in one texture based on another texture. For this we are going to use multi-texturing and a simple fragment shader.
(Multi-texturing essentially means using multiple textures while drawing a single piece of geometry, and it’s supported by GPUs.)
// setting multiple textures, context is a Stage3D context
context.setTextureAt(0, _texture.base); // fs0 in the shader
context.setTextureAt(1, _palette.base); // fs1 in the shader
Another thing we have to look out for is that we need a way to make parts of the images transparent. I mentioned earlier that this will be done using a special value (255) which means transparent. Fragment shaders have a command which will discard the fragment, making it invisible. We’ll do this by detecting when the value is 255.
This example uses the AGAL shader language. It can be a bit hard to understand, as it is an assembly-like language. You can learn more about it on the Adobe Developer Connection.
// read value from regular texture (to ft1)
tex ft1, v1, fs0 <2d, linear, mipnone, repeat>
// subtract the texture value (ft1.x) from
// alpha threshold (fc0.x defined to be 0.999 in main code)
sub ft2.x, fc0.x, ft1.x
// discard fragment if it represents the mask,
// 'kil' does that if the value is less than 0
kil ft2.x
// read color from palette using value from the regular texture (ft1)
tex ft2, ft1, fs1 <2d, nearest, mipnone, repeat>
// multiply vertex color with palette color and store it to the output
mul oc, ft2, v0
This can now be encapsulated in a custom Starling DisplayObject that contains the texture and the palette image – that’s how it’s implemented in the example source code.
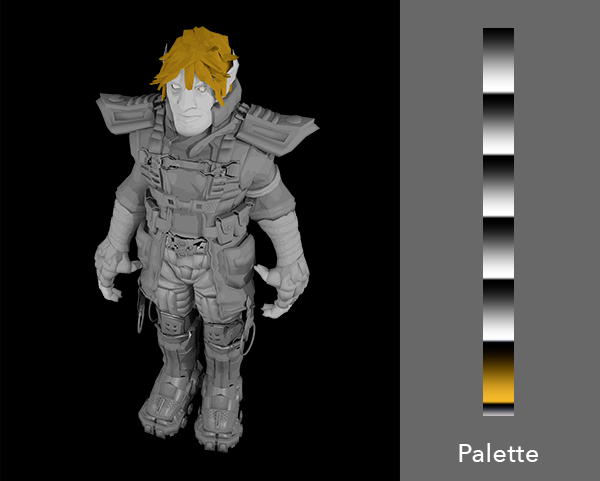
To change the actual colors of the character, we’ll need to change the palette. If we wanted to change the color for a particular part of the character, we would take the original grayscale palette and change the coloring of segment which corresponds to that part.

The part of the palette corresponding to hair is now colored.
The following code iterates through the palette and applies the appropriate color to each part:
// go through the palette
for (var i:int = 0; i < _paletteVector.length; i++)
{
    // 42 is the length of a segment in the palette
    var color:uint = _baseColors[int(i / 42)];

    // extract the RGB values from the segment color value and
    // multiply original grayscale palette
    var r:uint = Color.getRed(color) * _basePaletteVector[i];
    var g:uint = Color.getGreen(color) * _basePaletteVector[i];
    var b:uint = Color.getBlue(color) * _basePaletteVector[i];

    // create a new palette color by joining color components
    _paletteVector[i] = Color.rgb(r, g, b);
}
Our colors are saved as unsigned integers which encompass 8 bits of red, green and blue value. To get them out we would need to do some bitwise operations, luckily Starling offers helper methods for that in the Color class.
To enable the selection of character parts we keep the image data in memory. We can then determine the section of the character that a mouse click corresponds to by reading the pixel value at that point.
var characterColor:uint = _chracterBitmapData.getPixel(touchPoint.x, touchPoint.y);

// take the red value
var characterValue:uint = Color.getRed(characterColor);

// 255 means transparent so we'll use that as deselection
if (characterValue == 255) {
    _sectionSelection = SECTION_NONE;
}
else {
    // calculate the section, each section takes 42 pixels of the palette
    _sectionSelection = int(characterValue / 42) + 1;
}
We Can Do More
This implementation has some limitations, which can be solved with a little bit more work depending on your needs. The demo doesn’t show the sprite sheet animation, but this can be added without modification to the main palette class.
You may have noticed that the transparency is handled as visible and not visible. This causes rough edges which may not be suitable for all games. This can be solved using a mask – a grayscale image which represents the transparency value, from black (totally opaque) to white (totally transparent). This will increase the memory requirements a bit, however.
An alternative technique that can be used to change the color of the object parts is to use an additional texture or a channel. They are used as masks or lookup tables (which are themselves similar to palettes) to find color values which will be multiplied with the original texture. An example of this can be seen in this video:
Really interesting effects can be accomplished by animating the palette. In the example demo this is used to represent the character part where the color is being changed. We can do this by shifting the palette segment that represents a section of the character, creating a circular motion:
// save the starting value of the palette section
var tmp:int = _paletteVector[start];

// go through the section segment of the palette and shift the values to the left
for (var i:int = start; i < end; i++) {
     _paletteVector[i] = _paletteVector[i + 1];
}

// use saved staring value, wrapping around
_paletteVector[end] = tmp;
A rather stunning example of this can be seen here: Canvas Cycle.
A word of caution: if you are heavily relying on this technique for animation it may be better to do it on the CPU, because uploading the texture to the GPU for every palette change can be expensive.To gain some performance we can group multiple character palettes (1D) into a single image (2D) – this would enable us to add a variety of characters with minimal changes to the rendering state. The perfect use case for this is an MMO game.
Conclusion
The technique described here can be very effective in 2D MMO environments, especially for web games where the download size matters a lot. I hope that I managed to give you some ideas of what you can do if you think about your textures in a different way. Thanks for reading!