In this tutorial we’re going to be building a two-player tank game in Multimedia Fusion 2. It will feature custom 360 degree shooting and destructible terrain. You don’t need any previous programming or game development experience to follow along with this tutorial, and if you don’t have Multimedia Fusion 2 you can try the free demo.
Play the Game
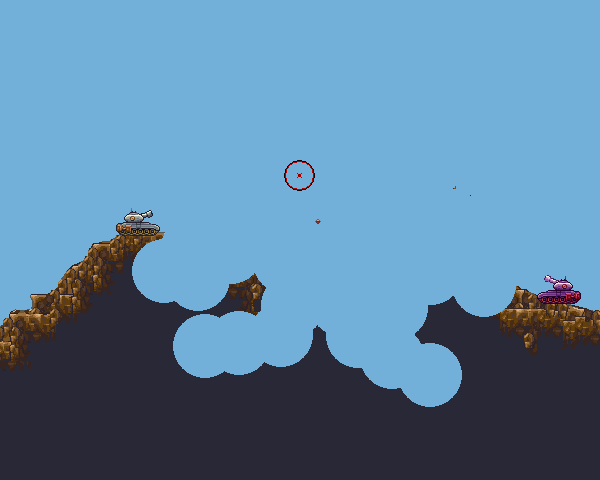
Take it in turns to fire at the other tank – Player One is on the left, and Player Two is on the right. Use the mouse to aim; the further away the crosshair is from your tank, the more powerful the shot will be. The first player to get hit loses.
Introduction
We’ll start by setting up our frame so that the game runs smoothly, and then we’ll add our first tank. After that we’ll make it shoot some bullets which destroy the terrain, and finally another player tank will be added to compete against.
Workspace Setup
Start by creating a new application in Multimedia Fusion 2 (download the demo here if you don’t already have it) and name it Artillery Game.
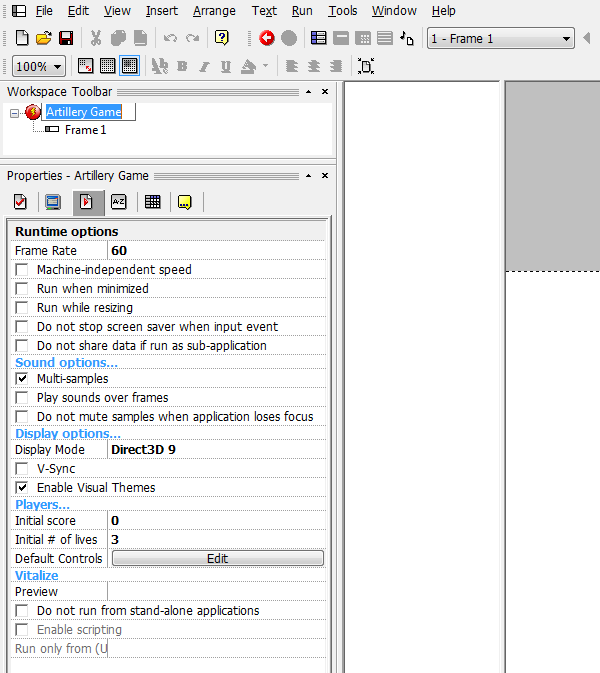
Under the Game’s Runtime options Set the Frame Rate to 60 and the Display Mode to Direct3D 9. These are the standard configuration settings I use on most games as they provide a smooth gameplay experience and take advantage of hardware acceleration on the player’s computer.
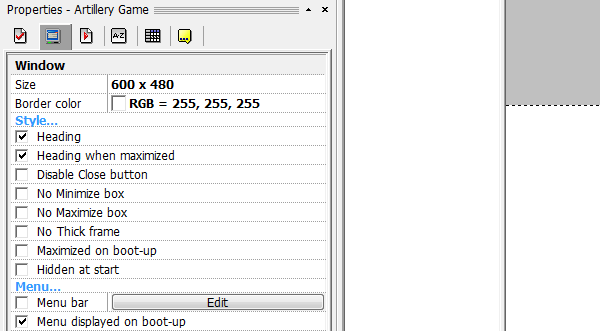
For this tutorial we’re also using a resolution of 600x480 which can be changed in the Window settings. Change the frame’s size to 600x480 as well.
To make things a little more professional we’ll also untick Menu bar to stop it from displaying in our game.
Step 1: Create Initial Scene
Now that we’re set up and ready to go it’s time to import some assets for our game.
You can get all of the graphics which I’m using in this tutorial from the source download, or you can draw your own if you’d like to. The graphics I’m using have been adapted from some free ones available at OpenGameArt.org
After you’ve saved the images to your computer, simply drag them one by one into Frame 1. This will import them into our game, prompting a dialog box to set each object’s type.
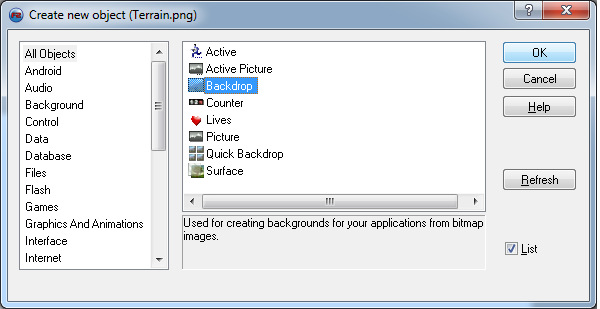
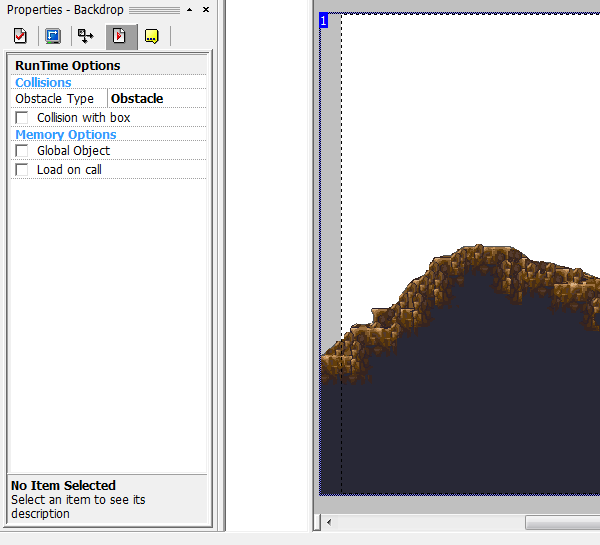
Start by importing the Terrain. Set it to a background object with its Obstacle Type set to Obstacle.
Next import Player One’s Tank as an Active Object, as well as Player One’s Turret. Name them P1Body and P1Turret respectively. Set the hotspot of the turret to (3,3), and the hotspot of the tank to (16,14). This will ensure that when we place the turret at the tank, it’s placed properly and rotates correctly.
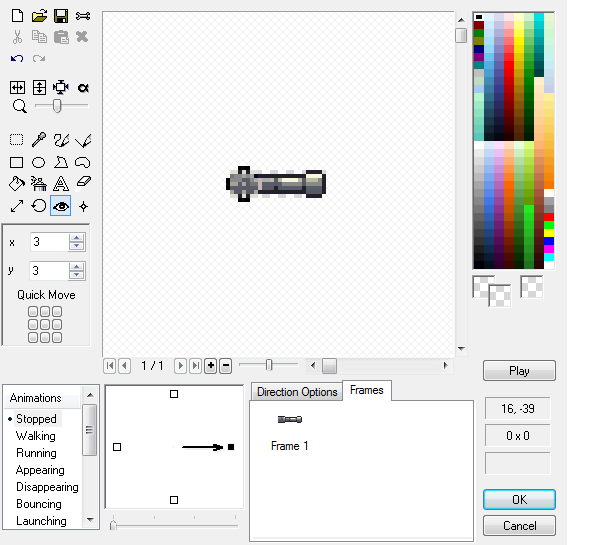
Also import the bullet and crosshair as Active Objects. We’ll import the other tank later. Center the hotspot of the crosshair at (15,15). Untick “Create at Start” on the bullet, and center its hotspot. Make sure the tank turret is behind the body in draw order by right-clicking it and sending it To Back, under the Order option.
Finally, change the background colour of the frame to a light blue (click Frame 1 in the Workspace Toolbar, and then alter the appropriate property from the Properties panel). Use RGB = 115,176,217. This colour will be important later when we add destructible terrain.
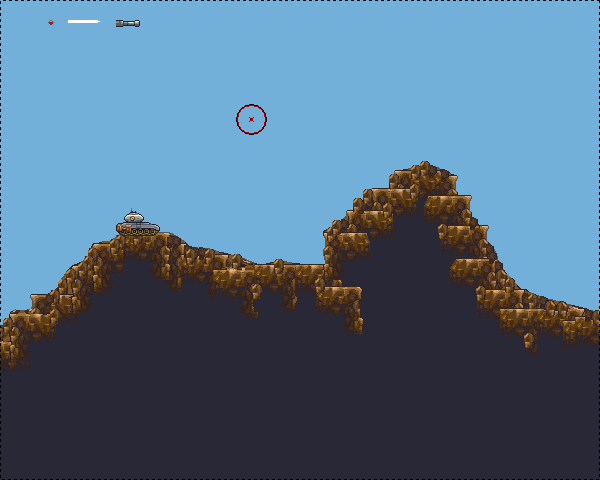
Arrange the objects in your frame so they look similar to how I have them in this image.
Step 2: Shoot a Bullet
Here we’re going to make our first tank shoot a bullet in a straight line. We’ll add gravity to the bullet later, as well as an explosion when it collides with the ground.
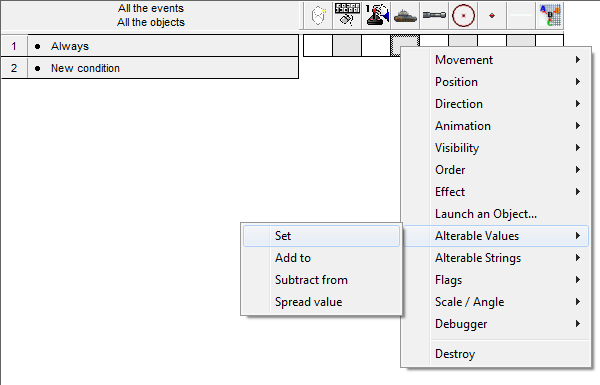
Firstly, create two alterable values for the tank called DistanceToMouse and AngleToMouse: select the tank, click the “A-Z” icon at the top of the Properties panel, and click “New” underneath “Alterable Values”. We’ll use these to store the Distance in pixels and Angle in degrees to the mouse, respectively.
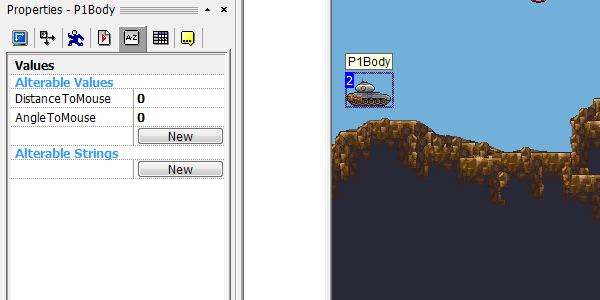
Next, create five alterable values for the bullet:
TempXTempYXSpeedYSpeedInitialSpeed
These values will be used to store the bullet’s movement information and implement our Custom 360 Degrees Movement.
It’s time to write some code. We’ll start by simply positioning the turret and making it aim towards the mouse.
Add the Advanced Direction Object to your game via Insert > New Object. We’ll use it for calculating the angle and distance to the mouse from our tank.
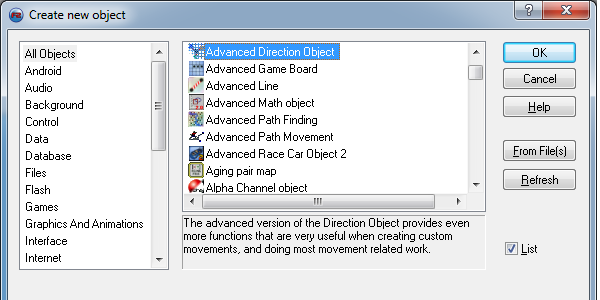
Tip: If you’re using the demo of Multimedia Fusion 2 you may not have access to the Advanced Direction Object which is available in Bonus Pack 1. In this case, to calculate the angle between two objects, you can simply use this formula:
360-ATan2(YMouse-Y("P1Body"), XMouse-X("P1Body"))
…instead of:
Distance("Advanced Direction Object", X("P1Body"), Y("P1Body"), XMouse, YMouse)
Then add the following code in the Event Editor (get to this via View > Event Editor):
+ Always
 - [P1Body] Set DistanceToMouse to:
 Distance("Advanced Direction Object", X("P1Body"), Y("P1Body"), XMouse, YMouse)
 - [P1Body] Set AngleToMouse to:
 Direction("Advanced Direction Object", X("P1Body"), Y("P1Body"), XMouse, YMouse)
 - [P1Turret] Set position at (0,0) from P1Body
 - [P1Turret] Set Angle To AngleToMouse("P1Body")
 - [Crosshair] Set X Coordinate to XMouse
 - [Crosshair] Set Y Coordinate to YMouse


If you run your game now you should see that the tank turret now points towards the crosshair, and that the crosshair is positioned at the mouse cursor.
Now let’s fire a bullet. Add the following code:
+ User clicks with left button
 - [Create] Create Bullet at (0,0) from P1Body
 - [Bullet] Set TempX to X("Bullet")
 - [Bullet] Set TempY to Y("Bullet")
 - [Bullet] Set InitialSpeed to Min(DistanceToMouse("P1Body")/17.0, 15)
 - [Bullet] Set XSpeed to Cos(AngleToMouse("P1Body"))*InitialSpeed("Bullet")
 - [Bullet] Set YSpeed to Sin(AngleToMouse("P1Body"))*InitialSpeed("Bullet")*-1
+ Always
- [Bullet] Add XSpeed("Bullet") to TempX("Bullet")
- [Bullet] Add YSpeed("Bullet") to TempY("Bullet")
- [Bullet] Set X Position to TempX("Bullet")
- [Bullet] Set Y Position to TempY("Bullet")
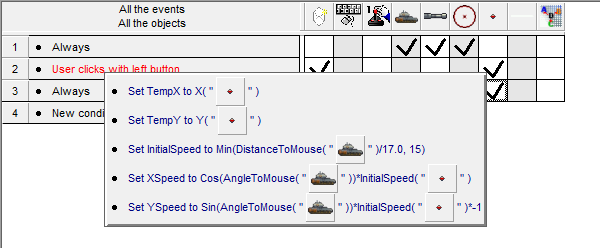
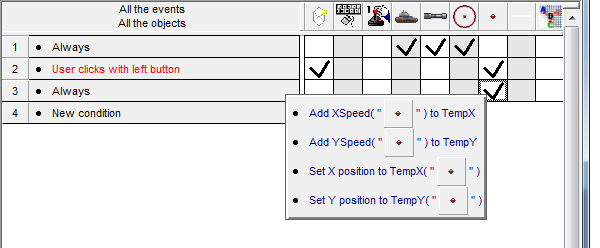
If you run your game (via the Run menu) you should see the tank shoot a bullet in a straight line with no gravity.
So What’s This Code Doing?
First we create a bullet at the body of the tank. We then use the values TempX and TempY to store the current position of the bullet. We set the initial speed of the Bullet to the distance from the tank to the mouse, with a maximum power of 15. (The distance is divided by 17.0 to scale its strength down.) These are just values that I simply made up after some testing. You can play with these two values yourself to change how quickly the bullet fires.
We then calculate the XSpeed and YSpeed from the angle and power using trigonometry. Don’t worry if you don’t understand the mathematics behind how this works!
Finally, in the Always event we continually update the position of the bullet stored in TempX and TempY by adding the bullet’s XSpeed and YSpeed respectively.
Why Use TempX and TempY?
We must store our intermediate positions in alterable values for custom movements since Multimedia Fusion 2 does not use floats (numbers with decimal points) for its coordinates – it uses integers (whole numbers).
If you try setting the Bullet’s X Position to X("Bullet") + 0.2 you will see that it won’t move anywhere, because 0.2 is rounded down to 0, and hence the Bullet is set to its current position.
Step 3: Add Gravity
Now that we can shoot a bullet, we need to add gravity to make the bullet fall once it leaves the tank’s cannon.
First, we need a place to store some values that will be used throughout our game such as the strength of gravity. In an MMF2 game there are numerous places to store this kind of information. Some people prefer to create a specific object just to hold values. In this tutorial we’re going to be using Global Values – values that are available from anywhere throughout the game – to hold our important values.
Go to the Global Values for your application (Click the Application in your Workspace Toolbar, then select the “A-Z” icon in the Properties panel) and create a new value: Y_Gravity.
Max_Speed and use it instead of “15.0″ where we calculate the InitialSpeed for the bullet. This will allow you to easily change the Maximum Power without having to edit your code everywhere it appears.MMF2 does not allow you to type floats in Global Values, and since we want our gravity to be less than one we’ll have to set it in code:

Now we simply have to add this gravity to the YSpeed of the bullet on each frame.
Add the line:
+Always
 - [Bullet] Add Y_Gravity To YSpeed
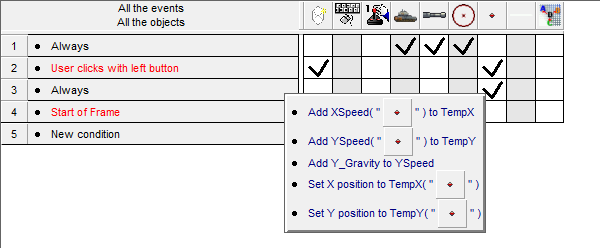
You can double-click any event to enter List Mode and change the order of event actions. Place the new line in between the existing actions as I have done here.
Now when you run the game your tank should shoot a bullet which falls back towards the ground.
Step 4: Destroy the Terrain
Next we need to make the bullet create holes in the ground when it collides with it. To do this we are going to take advantage of Multimedia Fusion’s “Add to Backdrop” function.
Add to Backdrop pastes an active object’s image into the backdrop permanently when the game is running. It can affect whether or not a particular part of the backdrop registers collisions. What we’re going to do is have a “hole” shape which cuts a circle into the background as big as the explosion animation that accompanies it.
Add a Hole
Import explosion_hole.png as an Active Object by dragging it into the frame. Center its hotspot at (32,32).
Import explosion_graphic_1.png as another active object. When asked if you would like to import explosion_graphic_2.png, etc., choose Yes.
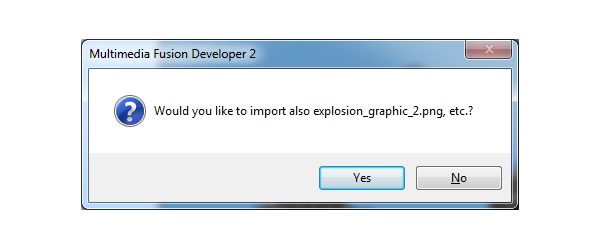
Center the hotspots on these explosion graphic frames as well.
The code for adding destructible terrain is quite simple. When a bullet collides with the backdrop, we need only to create the hole object and add it to the backdrop.
Create the hole when the Bullet collides with the background:

Add the hole to the backdrop as “Not an obstacle” (so that bullets can pass through it):
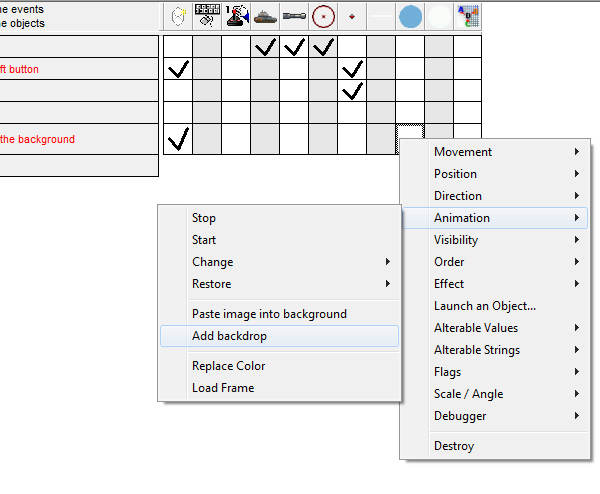
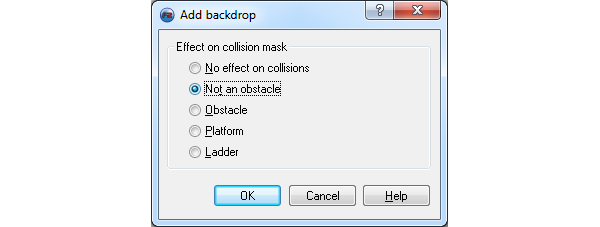
Also create a graphical explosion (one which will show where the Bullet hit) and destroy the Bullet at the end. We can also destroy the hole once it has been added to the backdrop:

Finally, destroy the graphical explosion when it has finished playing its animation:
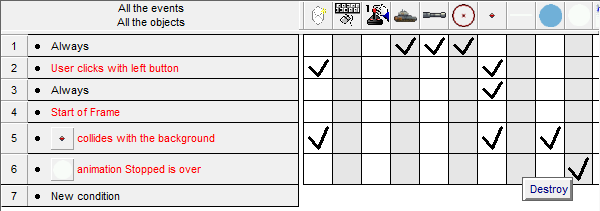
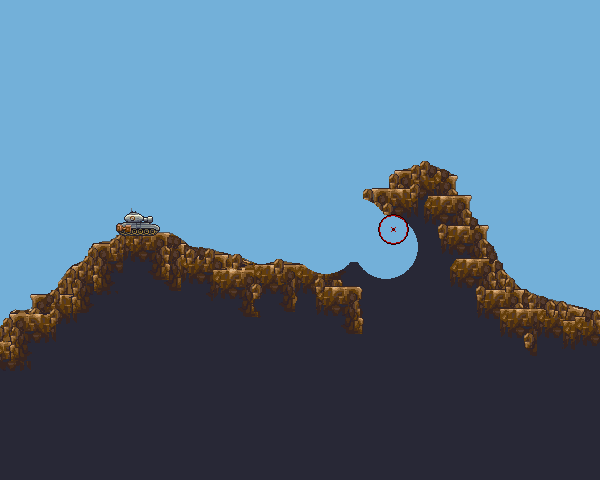
If you run the game you should now have a tank which is able to aim and shoot the terrain, creating explosions and leaving holes.
Step 5: Add Another Player
Finally we’re going to add another player to our game. We’re going to copy the code that we’ve already got for our first tank, and apply it to another one. We’re also going to need a new Global Variable to keep track of whose turn it is.
Add Player Two’s Graphics
Import Player Two’s tank body and turret the same way as you did with Player One. Place the second tank on the right side of the frame.
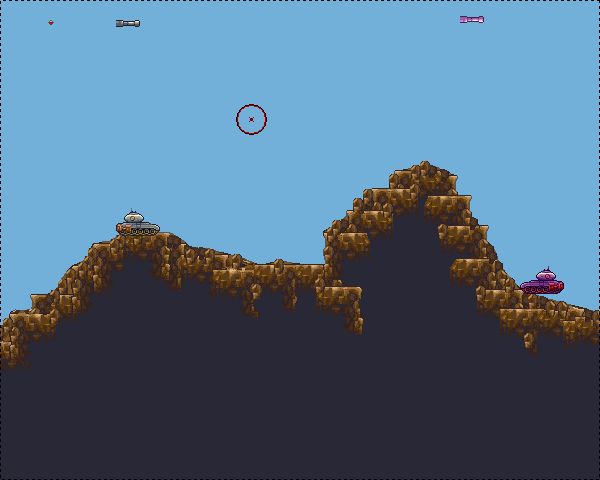
In the Event Editor, copy the code for the first tank into the second one, You will also need to create the alterable values DistanceToMouse and AngleToMouse in the second player’s tank. I’ve added comments to my code to make it easier to see. If you get stuck, just follow the first part of this tutorial again, but do it for the second tank.
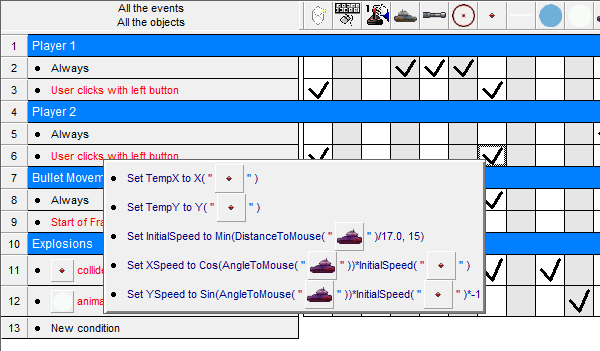
If you run the game now, both tanks will fire at the same time towards the crosshair.
Create New Variables
Create two new Global Variables called CurrentPlayerTurn and TurnCooldown.
TurnCooldown will be used to prevent the tanks from both firing at the same time. Whenever a player shoots we’ll set this cooldown to a small value, which will count down to zero, and we won’t allow the other player to shoot until this value reaches zero.
We will use CurrentPlayerTurn = 0 to represent Player One’s turn and CurrentPlayerTurn = 1 to represent Player Two’s turn.
Under Player One’s shooting code with User clicks with Left button, add the condition CurrentPlayerCooldown=0 so that a tank only looks at the mouse and is able to fire when it has turn control. To do this, use the “Compare To a Global Value” condition:
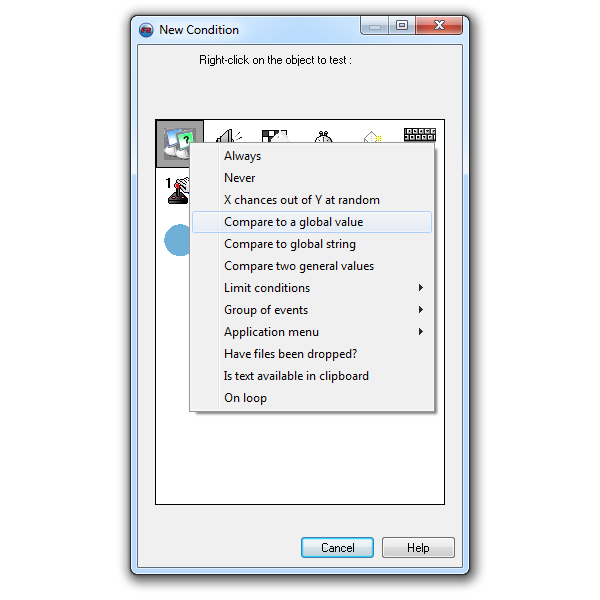
Also add the condition TurnCooldown=0 to ensure that the shot has cooled down before trying to shoot.
Add two more actions to Set the TurnCooldown to a small value of 3, and the CurrentPlayerTurn to 1-CurrentPlayerTurn. (This means that if CurrentPlayerTurn is 0 it will be set to 1, and if it’s 1 it will be set to 0.)
After doing all of this, here’s what your code should look like:

Duplicate the same code for Player Two, but change the condition to reflect Player Two’s turn with CurrentPlayerTurn = 1

And finally add one more condition to lower our cooldown whenever it’s greater than zero:

If you play the game now you should be able to shoot both the tanks at each other, with each shot alternating the current tank’s turn.
Step 6: Add Win Condition
Now that we can shoot, all we need to do is add a way to blow each other up! This is pretty simple. We simply need to detect whether an explosion is overlapping a tank, and if it is, we destroy the tank and don’t allow anyone to fire after that.
Add the following code:
+ [Explosion_Graphic] is overlapping [P1Body]
- Destroy [P1Body]
- Destroy [P1Turret]
- Set CurrentPlayerTurn to -1
+ [Explosion_Graphic] is overlapping [P2Body] - Destroy [P2Body] - Destroy [P2Turret] - Set CurrentPlayerTurn to -1
Here’s how the code looks for Player One:

Destroying the players and their turrets is pretty self-explanatory. We set the CurrentPlayerTurn to -1 so that the players can no longer fire (as the conditions require CurrentPlayerTurn to be equal to 0 or 1).
If you run your game you should be able to take turns shooting each other until one of you blows up!
Conclusion
Now you’ve got a fully functional two-player tank game that you can play with your friends. From here you can add things such as random wind speed which affects the bullet’s trajectory, new weapons, sounds, particle effects, and more!
Have fun with it!