This is the first in a series of tutorials in which we will create a synthesizer based audio engine that can generate sounds for retro-styled games. The audio engine will generate all of the sounds at runtime without the need for any external dependencies such as MP3 files or WAV files. The end result will be a working library that can be dropped effortlessly into your games.
Before we can start to create the audio engine there are a few things that we will need to understand; these include the waveforms that the audio engine will be using to generate the audible sounds, and how sound waves are stored and represented in digital form.
The programming language used in this tutorial is ActionScript 3.0 but the techniques and concepts used can easily be translated into any other programming language that provides a low-level sound API.
You should make sure you have Flash Player 11.4 or higher installed for your browser if you want to use the interactive examples in this tutorial.
The Waveforms
The audio engine that we will be creating will use four basic waveforms (also known as periodic waveforms, because their basic shapes repeat periodically) all of which are extremely common in both analog and digital synthesizers. Each waveform has its own unique audible characteristic.
The following sections provide a visual rendering of each waveform, an audible example of each waveform, and the code required to generate each waveform as an array of sample data.
Pulse

The pulse wave produces a sharp and harmonic sound.
To generate an array of values (in the range -1.0 to 1.0) that represent a pulse wave we can use the following code, where n is the number of values required to populate the array, a is the array, and p is the normalised position within the waveform:
var i:int = 0;
var n:int = 100;
var p:Number;
while( i < n ) {
    p = i / n;
    a[i] = p < 0.5 ? 1.0 : -1.0;
    i ++;
}
Sawtooth
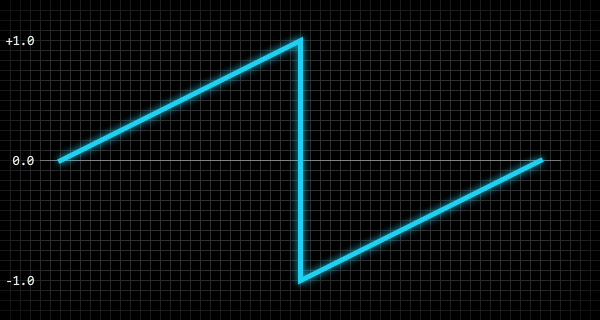
The sawtooth wave produces a sharp and harsh sound.
To generate an array of values (in the range -1.0 to 1.0) that represent a sawtooth wave we can use the following code, where n is the number of values required to populate the array, a is the array, and p is the normalised position within the waveform:
var i:int = 0;
var n:int = 100;
var p:Number;
while( i < n ) {
    p = i / n;
    a[i] = p < 0.5 ? p * 2.0 : p * 2.0 - 2.0;
    i ++;
}
Sine
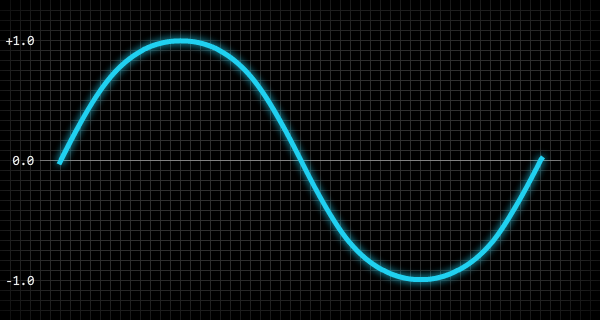
The sine wave produces a smooth and pure sound.
To generate an array of values (in the range -1.0 to 1.0) that represent a sine wave we can use the following code, where n is the number of values required to populate the array, a is the array, and p is the normalised position within the waveform:
var i:int = 0;
var n:int = 100;
var p:Number;
while( i < n ) {
    p = i / n;
    a[i] = Math.sin( p * 2.0 * Math.PI );
    i ++;
}
Triangle
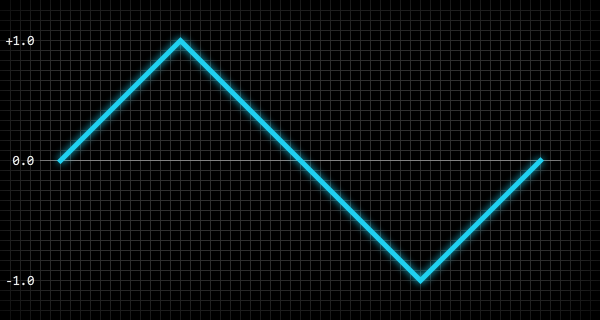
The triangle wave produces a smooth and harmonic sound.
To generate an array of values (in the range -1.0 to 1.0) that represent a triangle wave we can use the following code, where n is the number of values required to populate the array, a is the array, and p is the normalised position within the waveform:
var i:int = 0;
var n:int = 100;
var p:Number;
while( i < n ) {
    p = i / n;
    a[i] = p < 0.25 ? p * 4.0 : p < 0.75 ? 2.0 - p * 4.0 : p * 4.0 - 4.0;
    i ++;
}
Here’s an expanded version of line 6:
if (p < 0.25) {
    a[i] = p * 4.0;
}
else if (p < 0.75) {
    a[i] = 2.0 - (p * 4.0);
}
else {
    a[i] = (p * 4.0) - 4.0;
}
Waveform Amplitude and Frequency
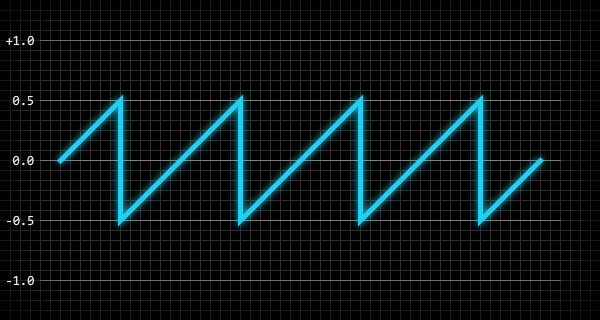
Two important properties of a sound wave are the amplitude and frequency of the waveform: these dictate the volume and pitch of the sound, respectively. The amplitude is simply the absolute peak value of the waveform, and the frequency is the number of times the waveform is repeated per second which is normally measured in hertz (Hz).
The following image is a 200 millisecond snapshot of a sawtooth waveform with an amplitude of 0.5 and a frequency of 20 hertz:
To give you an idea of how the frequency of a waveform directly relates to the pitch of the audible sound, a waveform with a frequency of 440 hertz would produce the same pitch as the standard A4 note (middle A) on a modern concert piano. With that frequency in mind, we are able to calculate the frequency of any note by using the following code:
f = Math.pow( 2, n / 12 ) * 440.0;
The n variable in that code is the number of notes from A4 (middle A) to the note we are interested in. For example, to find the frequency of A5, one octave above A4, we would set the value of n to 12 because A5 is 12 notes above A4. To find the frequency of E2 we would set the value of n to -5 because E2 is 5 notes below A4. We can also do the reverse and find a note (relative to A4) for a given frequency:
n = Math.round( 12.0 * Math.log( f / 440.0 ) * Math.LOG2E );
The reason why these calculations work is because note frequencies are logarithmic – multiplying a frequency by two moves a note up a single octave, while dividing a frequency by two moves a note down a single octave.
Digital Sound Waves
In the digital world, sound waves need to be stored as binary data, and the common way of doing that is to take periodic snapshots (or samples) of a sound wave. The number of wave samples that are taken for each second of a sound’s duration is known as the sample rate, so a sound with a sample rate of 44100 will contain 44100 wave samples (per channel) for every second of the sound’s duration.
The following image demonstrates how a sound wave might be sampled:
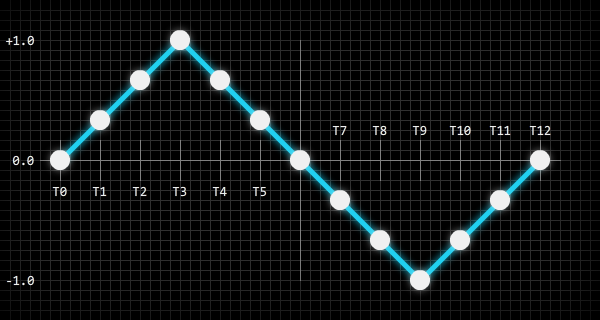
The white blobs in that image represent the amplitude points of the wave that are sampled and stored in a digital format. You can think of this as the resolution of a bitmap image: the more pixels a bitmap image contains the more visual information it can hold, and more information results in bigger files (ignore file compression for now). The same is true for digital sounds: the more wave samples a sound file contains the more accurate the reconstructed sound wave will be.
As well as having a sample rate, digital sounds also have a bit rate which is measured in bits per second. The bit rate dictates how many binary bits are used to store each wave sample. This is similar to the number of bits used to store ARGB information for each pixel in a bitmap image. For example, a sound with a sample rate of 44100 and a bit rate of 705600 would be storing each of its wave samples as a 16-bit value, and we can calculate that easily enough using the following code:
bitsPerSample = bitRate / sampleRate;
Here is a working example using the values mentioned above:
trace( 705600 / 44100 ); // "16"
Understanding what sound samples are is the most important thing here; the audio engine that we will be creating will have to generate and manipulate raw sound samples.
Modulators
One more thing that we should be aware of before we start to program the audio engine are modulators, which are extremely common in both analog and digital synthesizers. A modulator is essentially just a standard waveform, but instead of being used to produce a sound they are commonly used to modulate one or more properties of an audible waveform (e.g. its amplitude or frequency).
Take vibrato, for example. Vibrato is a regular pulsating change of pitch. To produce that effect using a modulator you could set the modulator’s waveform to a sine wave, and set the modulator’s frequency to somewhere around 8 hertz. If you then hooked that modulator up to the frequency of an audible waveform the result would be a vibrato effect – the modulator would smoothly raise and lower the frequency (pitch) of the audible waveform eight times per second.
The audio engine that we will be creating will allow you to attach modulators to your sounds to allow you produce a vast number of different effects.
Coming Up…
In the next tutorial we will create the core code for the audio engine and get everything up and running. Follow us on Twitter, Facebook, or Google+ to keep up to date with the latest posts.