In my previous Tetris tutorial, I showed you how to handle collision detection in Tetris. Now let’s take a look at the other important aspect of the game: line clears.
Note: Although the code in this tutorial is written using AS3, you should be able to use the same techniques and concepts in almost any game development environment.
Detecting a Completed Line
Detecting that a line has been filled is actually very simple; just looking at the array of arrays will make it quite obvious what to do:

The filled line is the one that has no zeroes in it – so we can check a given row like this:
row = 4;   //check fourth row
isFilled = true;
for (var col = 0; col < landed[row].length; col++) {
    if (landed[row][col] == 0) {
        isFilled = false;
    }
}
//if isFilled is still true than row 4 is filled
With this, of course, we can loop through each row and figure out which of them are filled:
for (var row = 0; col < landed.length; row++) {
    isFilled = true;
    for (var col = 0; col < landed[row].length; col++) {
        if (landed[row][col] == 0) {
            isFilled = false;
        }
    }
    //if isFilled is still true then current row is filled
}
Okay, we could optimise this by figuring out which lines are likely to be filled, based on which rows the latest block occupies, but why bother? Looping through every single element in the 10×16 grid is not a processor-intensive task.
The question now is: how do we clear the lines?
The Naive Method
At first glance, this seems simple: we just splice the filled row(s) from the array, and add new blank lines at the top.
for (var row = 0; row < landed.length; row++) {
    isFilled = true;
    for (var col = 0; col < landed[row].length; col++) {
        if (landed[row][col] == 0) {
            isFilled = false;
        }
    }
    //remove the filled line sub-array from the array
    landed.splice(row, 1);
    //add a new empty line sub-array to the start of the array
    landed.unshift([0,0,0,0,0,0,0,0,0,0]);
}
If we try this on the above array (and then render everything), we get:
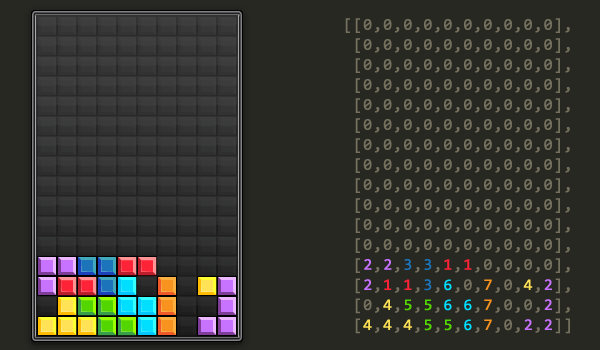
…which is what we’d expect, right? There are still 16 rows, but the filled one has been removed; the new blank line has pushed everything down to compensate.
Here’s a simpler example, with the before and after pics side-by-side:
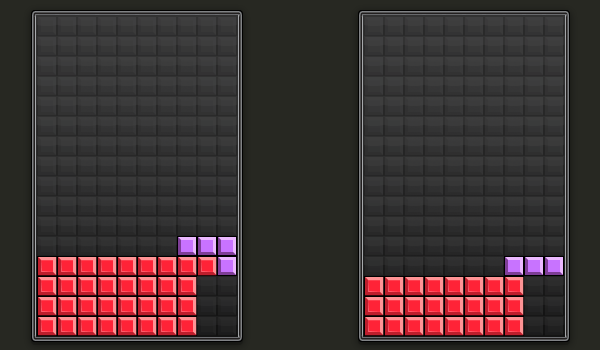
Another expected result. And – although I won’t show it here – the same code also deals with situations where more than one line is filled at once (even if those lines are not adjacent).
However, there are cases where this doesn’t do what you might expect. Take a look at this:
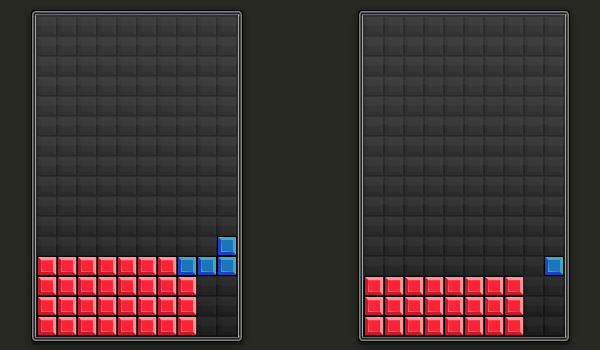
It’s strange to see that blue block floating there, attached to nothing. It’s not wrong, exactly – most versions of Tetris do this, including the classic Game Boy edition – so you could leave it at that.
However, there are a couple of other popular ways to deal with this…
The Big Clump Method
What if we made that solitary blue block continue falling after the line was cleared?
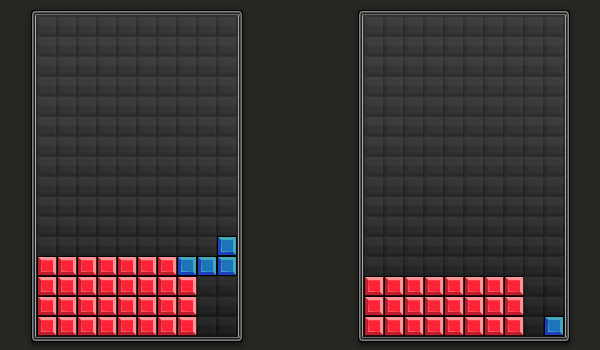
The big difficulty with this is actually figuring out exactly what we’re trying to do. It’s harder than it sounds!
My first instinct here would be to make every individual block fall down until it had landed. That would lead to situations like this:
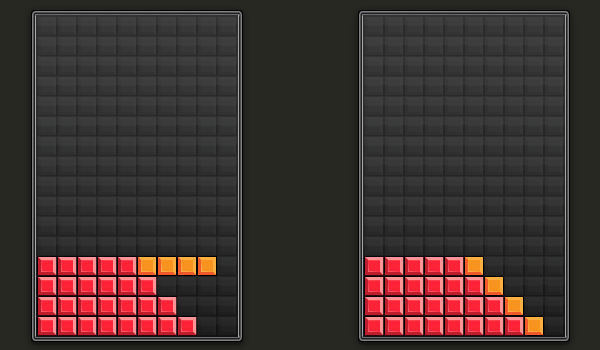
…but I suspect that this would be no fun, as all gaps would quickly get filled. (Do feel free to experiment with this, though – there might be something in it!)
I want those orange blocks to stay connected, but that blue block to fall. Maybe we could make blocks fall if they have no other blocks to the left or right of them? Ah, but look at this situation:
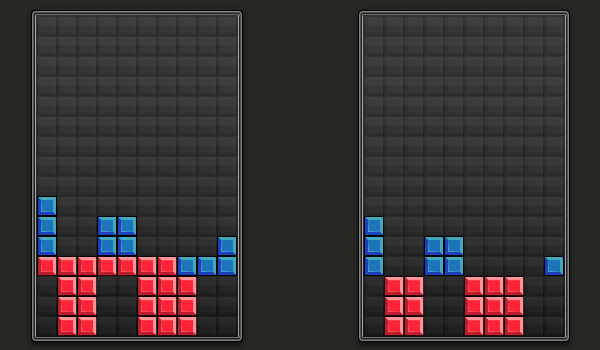
Here, I want the blue blocks to all fall into their respective “holes” after the line is cleared – but the middle set of blue blocks all have other blocks next to them: other blue blocks!
(“So only check whether the blocks are next to red blocks,” you might think, but remember that I’ve only coloured them in blue and red to make it easier to refer to different blocks; they could be any colours, and they could have been laid at any time.)
We can identify one thing that the blue blocks in the right-hand image – and the lone floating blue block from before – all in common: they are above the line that got cleared. So, what if instead of trying to make the individual blocks fall, we group all of these blue blocks together and make them fall as one?
We could even re-use the same code that makes an individual tetromino fall. Here’s a reminder, from the previous tutorial:
//set tetromino.potentialTopLeft to be one row below tetromino.topLeft, then:
for (var row = 0; row < tetromino.shape.length; row++) {
    for (var col = 0; col < tetromino.shape[row].length; col++) {
        if (tetromino.shape[row][col] != 0) {
            if (row + tetromino.potentialTopLeft.row >= landed.length) {
                //this block would be below the playing field
            }
            else if (landed[row + tetromino.potentialTopLeft.row] != 0 &&
                landed[col + tetromino.potentialTopLeft.col] != 0) {
                //the space is taken
            }
        }
     }
}
But rather than than using a tetromino object, we’ll create a new object whose shape contains just the blue blocks – let’s call this object clump.
Transferring the blocks is just a matter of looping through the landed array, finding every non-zero element, filling in the same element in the clump.shape array, and setting the element of the landed array to zero.
As usual, this is easier to understand with a picture:
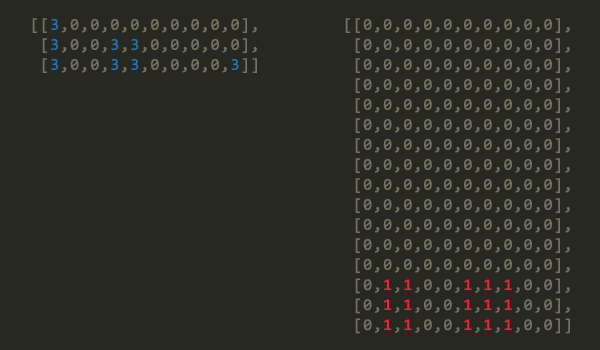
On the left is the clump.shape array, and on the right is the landed array. Here, I’m not bothering to fill in any blank rows in clump.shape to keep things neater, but you could do so without any problems.
So, our clump object looks like this:
clump.shape = [[1,0,0,0,0,0,0,0,0,0],
                   [1,0,0,1,1,0,0,0,0,0],
                   [1,0,0,1,1,0,0,0,0,1]];
clump.topLeft = {row: 10, col: 0};
…and now we just repeatedly run the same code that we use to make a tetromino fall, until the clump lands:
//set clump.potentialTopLeft to be one row below clump.topLeft, then:
for (var row = 0; row < clump.shape.length; row++) {
    for (var col = 0; col < clump.shape[row].length; col++) {
        if (clump.shape[row][col] != 0) {
            if (row + clump.potentialTopLeft.row >= landed.length) {
                //this block would be below the playing field
            }
            else if (landed[row + clump.potentialTopLeft.row] != 0 &&
                landed[col + clump.potentialTopLeft.col] != 0) {
                //the space is taken
            }
        }
     }
}
Once the clump has landed, we copy the individual elements back to the landed array – again, just like when a tetromino lands. However, rather than running this every half second and re-rendering everything between each fall, I suggest running it over and over again until the clump lands, as quickly as possible, and then rendering everything, so that it looks like it drops instantly.
Follow this through if you like; here’s the result:
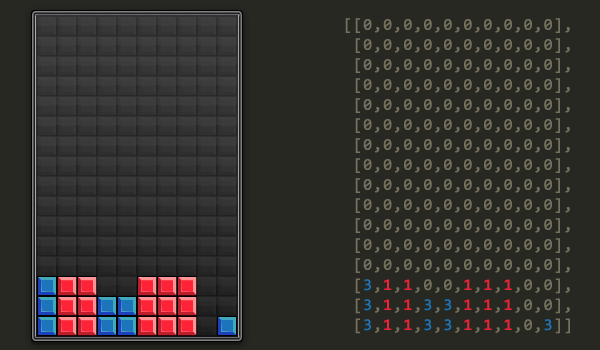
It’s possible that another line will be formed here, without the player having to drop another block – opening up possible player strategies not available with the Naive method – so you must immediately check for filled lines again. In this case, there are no filled lines, so the game can continue, and you can spawn another block.
All seems good for the Clump method, but unfortunately there is a problem, as shown in this before-and-after example:
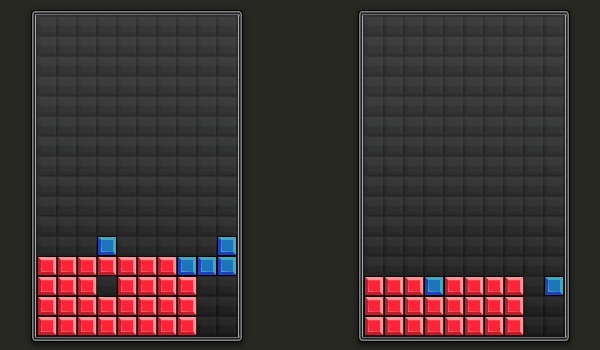
After the filled line disappears, both blue blocks fall two squares and then stop.
Here, the blue block in the middle has landed – and since it’s clumped together with the blue block on the right, that one is considered to have “landed” as well. The next block would spawn, and again we have a blue block floating in mid-air.
The Big Clump method isn’t actually an effective method, due to this unintuitive problem, but it is halfway to a good method…
The Sticky Method
Look again at these two examples:


In both cases, there’s an obvious way to separate the blue blocks into separate clumps – two clumps (each of one block) in the first, and three clumps (of three, four, and one blocks) in the second.
If we clump the blocks like that, and then make each clump fall independently, then we should get the desired result! Additionally, “clump” will no longer appear to be a word.
Here’s what I mean:
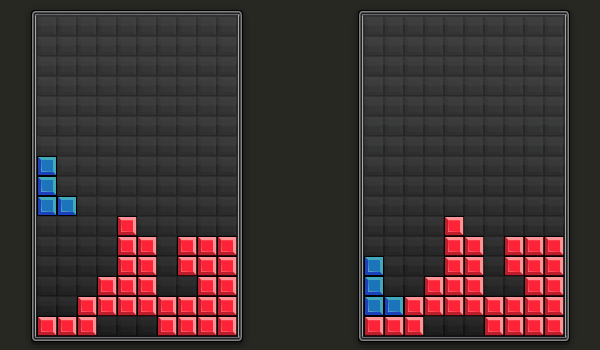
We start with this situation. Obviously, the second line up is going to get cleared.
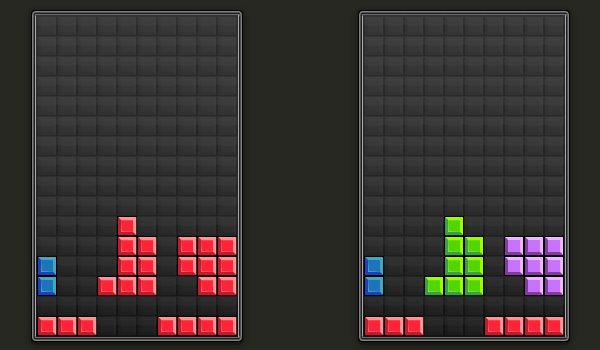
We split the blocks above the cleared line into three distinct clumps. (I’ve used different colours to identify which blocks clump together.)
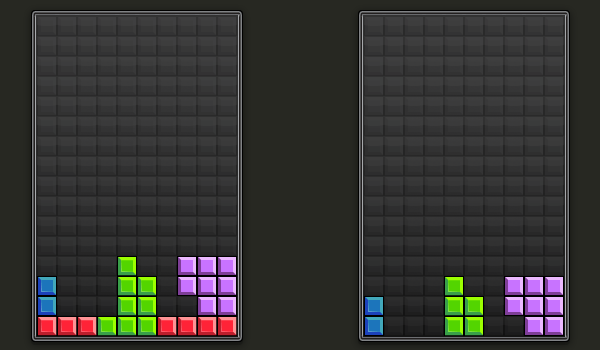
The clumps fall independently – notice how the green clump falls two rows, while the blue and purple clumps land after falling just one. The bottom line is now filled, so this gets cleared as well, and the three clumps fall.
How do we figure out the shape of the clumps? Well, as you can see from the image, it’s actually rather simple: we group all the blocks up into contiguous shapes – that is, for each block, we group it up with all of its neighbours, and its neighbours’ neighbours, and so on, until every block is in a group.
Rather than explain exactly how to do this grouping, I’ll point you at the Wikipedia page for flood fill, which explains several ways to achieve this, along with the pros and cons of each.
Once you’ve got your clumps’ shapes, you can stick them in an array:
clumps = [];
clumps[0].shape = [[3],
                   [3]];
clumps[0].topLeft = {row: 11, col: 0};
clumps[1].shape = [[0,1,0],
                   [0,1,1],
                   [0,1,1],
                   [1,1,1]];
clumps[1].topLeft = {row: 9, col: 3};
clumps[2].shape = [[1,1,1],
                   [1,1,1],
                   [0,1,1]];
clumps[2].topLeft = {row: 10, col: 7};
Then, just iterate each clump in the array falling, remembering to check for new filled lines once they’ve landed.
This is called the Sticky method, and it’s used in a few games, such as Tetris Blast. I like it; it’s a decent twist on Tetris, allowing for new strategies. There’s one other popular method that’s quite a bit different…
Challenge: The Cascade Method
If you’ve followed the concepts so far, I think it’s worth trying to implement the Cascade method yourself as an exercise.
Basically, each block remembers which tetromino it was part of, even when a segment of that tetromino gets destroyed by a line clear. The tetrominoes – or weird, chopped up parts of tetrominoes – fall as clumps.
As always, pictures help:
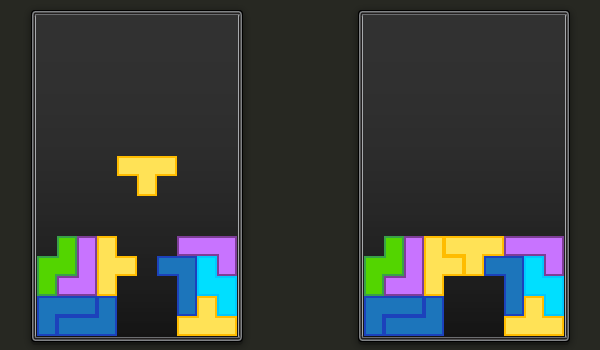
A T-tetromino falls, completing a line. Note how each block remains connected to its original tetromino? (We’ll assume here that no lines have been cleared so far.)

The completed line is cleared, which splits the green Z-tetromino into two separate pieces, and chops pieces off other tetrominoes.
The T-tetromino (or what’s left of it) continues to fall, because it is not held up by any other blocks.
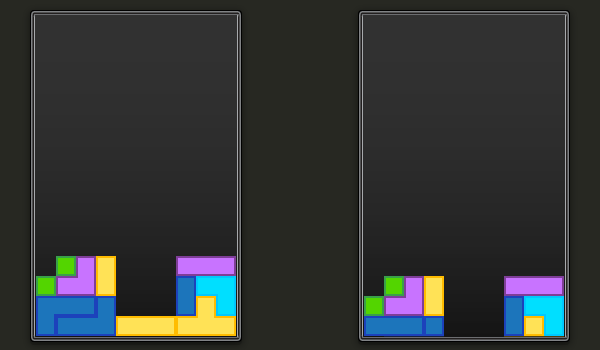
The T-tetromino lands, completing another line. This line is cleared, chopping pieces off yet more tetrominoes.
As you can see, the Cascade method plays quite a bit differently to the other two main methods. If you’re still unclear about how it works, see if you can find a copy of Quadra or Tetris 2 (or look up videos on YouTube), as they both use this method.
Good luck!
Conclusion
Thanks for reading this tutorial! I hope you learned something (and not just about Tetris), and that you’ll have a go at the challenge. If you make any games using these techniques, I’d love to see them! Please post them in the comments below, or tweet me at @MichaelJW.
Don’t forget, you can follow us on Twitter, Facebook, or Google+ to keep up to date with the latest posts.