The Web Audio API is a powerful ally for anyone creating JavaScript games, but with that power comes complexity. Web Audio is a modular system; audio nodes can be connected together to form complex graphs to handle everything from the playback of a single sound through to a fully featured music sequencing application. This is impressive, to say the least.
However, when it comes to programming games most developers want a basic API that simply loads and plays sounds, and provides options for changing the volume, pitch, and pan (stereo position) of those sounds. This tutorial provides an elegant solution by wrapping the Web Audio API in a fast, lightweight Sound class that handles everything for you.
Note:This tutorial is primarily aimed at JavaScript programmers, but the techniques used to mix and manipulate audio in the code can be applied to almost any programming environment that provides access to a low-level sound API.
Live Demo
Before we get started, take a look at the live demo of the Sound class in action. You can click the buttons in the demo to play sounds:
SFX 01is a single-shot sound with default settings.SFX 02is a single-shot sound that has its pan (stereo position) and volume randomized each time it is played.SFX 03is a looping sound; clicking the button will toggle the sound on and off, and the mouse pointer position within the button will adjust the sound's pitch.
Note:If you do not hear any sounds being played, the web browser you are using does not support the Web Audio API or OGG Vorbis audio streams. Using Chrome or Firefox should solve the problem.
Life Can Be Simpler
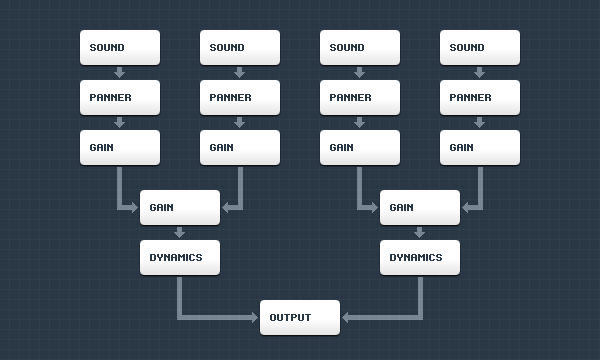
The following image visualizes a basic Web Audio node graph:

As you can see there are quite a few audio nodes in the graph to handle the playback of four sounds in a way that is suitable for games. The panner and gain nodes deal with panning and volume, and there are a couple of dynamics compressor nodes in there to help prevent any audible artifacts (clips, pops, and so on) if the graph ends up being overloaded by loud audio.
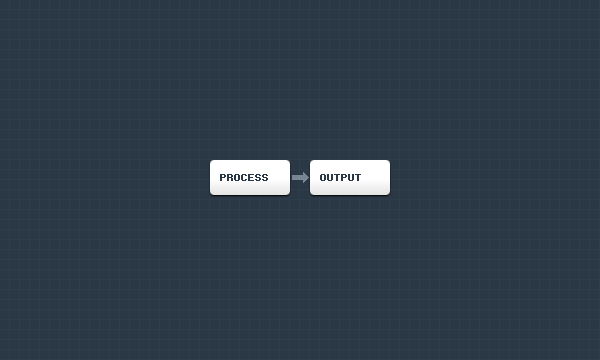
Being able to create audio node graphs like that in JavaScript is awesome, but having to constantly create, connect, and disconnect those nodes can become a real burden. We are going to simplify things by handling the audio mixing and manipulation programmatically, using a single script processor node.

Yep, that is definitely much simpler—and it also avoids the processing overhead involved in creating, connecting, and disconnecting a load of audio nodes every time a sound needs to be played.
There are other quirks in the Web Audio API that can make things difficult. The panner node, for example, is designed specifically for sounds that are positioned in 3D space, not 2D space, and audio buffer source nodes (labelled "sound" in the previous image) can only be played once, hence the need to constantly create and connect those node types.
The single script processor node that is used by the Sound class periodically requests sound samples to be passed to it from JavaScript, and that makes things a lot easier for us. We can mix and manipulate sound samples very quickly and easily in JavaScript, to produce the volume, pitch, and panning functionality we need for 2D games.
The Sound Class
Instead of baby-stepping through the creation of the Sound class, we will take a look at the core parts of the code that are directly related to the Web Audio API and the manipulation of sound samples. The demo source files include the fully functional Sound class, which you can freely study and use in your own projects.
Loading Sound Files
The Sound class loads sound files over a network as array buffers using XMLHttpRequest objects. The array buffers are then decoded into raw sound samples by an audio context object.
request.open( "GET", "sound.ogg" );
request.onload = decode;
request.responseType = "arraybuffer";
request.open();

function decode() {
    if( request.response !== null ) {
        audioContext.decodeAudioData( request.response, done );
    }
}

function done( audioBuffer ) {
    ...
}
Obviously there is no error handling in that code, but it does demonstrate how the sound files are loaded and decoded. The audioBuffer passed to the done() function contains the raw sound samples from the loaded sound file.
Mixing and Manipulating Sound Samples
To mix and manipulate the loaded sound samples, the Sound class attaches a listener to a script processor node. This listener will be called periodically to request more sound samples.
// Calculate a buffer size.
// This will produce a sensible value that balances audio
// latency and CPU usage for games running at 60 Hz.
var v = audioContext.sampleRate / 60;
var n = 0;

while( v > 0 ) {
    v >>= 1;
    n ++;
}

v = Math.pow( 2, n ); // buffer size

// Create the script processor.
processor = audioContext.createScriptProcessor( v );

// Attach the listener.
processor.onaudioprocess = processSamples;

function processSamples( event ) {
    ...
}
The frequency at which the processSamples() function is called will vary on different hardware setups, but it is usually around 45 times per second. That may sound like a lot, but it is required to keep the audio latency low enough to be usable in modern games that typically run at 60 frames per second. If the audio latency is too high, the sounds will be heard too late to synchronize with what is happening on-screen, and that would be a jarring experience for anyone playing a game.
Despite the frequency at which the processSamples() function is called, the CPU usage remains low, so do not worry about too much time being taken away from the game logic and rendering. On my hardware (Intel Core i3, 3 GHz) the CPU usage rarely exceeds 2%, even when a lot of sounds are being played simultaneously.
The processSamples() function actually contains the meat of the Sound class; it is where the sound samples are mixed and manipulated before being pushed through web audio to the hardware. The following code demonstrates what happens inside the function:
// Grab the sound sample.
sampleL = samplesL[ soundPosition >> 0 ];
sampleR = samplesR[ soundPosition >> 0 ];

// Increase the sound's playhead position.
soundPosition += soundScale;

// Apply the global volume (affects all sounds).
sampleL *= globalVolume;
sampleR *= globalVolume;

// Apply the sound's volume.
sampleL *= soundVolume;
sampleR *= soundVolume;

// Apply the sound's pan (stereo position).
sampleL *= 1.0 - soundPan;
sampleR *= 1.0 + soundPan;
That's more or less all there is to it. That is the magic: a handful of simple operations change the volume, pitch and stereo position of a sound.
If you are a programmer and familiar with this type of sound processing, you may be thinking, "that cannot be all there is to it", and you would be correct: the Sound class needs to keep track of sound instances, sample buffers and do a few other things—but that is all run-of-the-mill!
Using the Sound Class
The following code demonstrates how to use the Sound class. You can also download the source files for the live demo accompanying this tutorial.
// Create a couple of Sound objects.
var boom = new Sound( "boom.ogg" );
var tick = new Sound( "tick.ogg" );

// Optionally pass a listener to the Sound class.
Sound.setListener( listener );

// This will load any newly created Sound objects.
Sound.load();

// The listener.
function listener( sound, state ) {
    if( state === Sound.State.LOADED ) {
        if( sound === tick ) {
            setInterval( playTick, 1000 );
        }
        else if( sound === boom ) {
            setInterval( playBoom, 4000 );
        }
    }
    else if( state === Sound.State.ERROR ) {
        console.warn( "Sound error: %s", sound.getPath() );
    }
}

// Plays the tick sound.
function playTick() {
    tick.play();
}

// Plays the boom sound.
function playBoom() {
    boom.play();
    // Randomize the sound's pitch and volume.
    boom.setScale( 0.8 + 0.4 * Math.random() );
    boom.setVolume( 0.2 + 0.8 * Math.random() );
}
Nice and easy.
One thing to note: it does not matter if the Web Audio API is unavailable in a browser, and it does not matter if the browser cannot play a specific sound format. You can still call the play() and stop() functions on a Sound object without any errors being thrown. That is intentional; it allows you to run your game code as usual without worrying about browser compatibility issues or branching your code to deal with those issues. The worst that can happen is silence.
The Sound Class API
play()stop()getPath(): Gets the sound's file path.getState()getPan()setPan( value ): Sets the sound's pan (stereo position).getScale()setScale( value ): Sets the sound's scale (pitch).getVolume()setVolume( value ): Sets the sound's volume.isPending()isLoading()isLoaded()isLooped()
The Sound class also contains the following static functions.
load(): Loads newly created sounds.stop(): Stops all sounds.getVolume()setVolume( value ): Sets the global (master) volume.getListener()setListener( value ): Keeps track of sound loading progress etc.canPlay( format ): Checks if various sound formats can be played.
Documentation can be found in the demo's source code.
Conclusion
Playing sound effects in a JavaScript game should be simple, and this tutorial makes it so by wrapping the powerful Web Audio API in a fast, lightweight Sound class that handles everything for you.
Related Resources
If you are interested in learning more about sound samples and how to manipulate them, I have written a series for Tuts+ that should keep you busy for a while ...
- Creating a Synthesizer - Introduction
- Creating a Synthesizer - Core Engine
- Creating a Synthesizer - Audio Processors
The following links are for the W3C and Khronos standardized specifications that are directly related to the Web Audio API:
